Pictures made from cut multi-colored copper wire. MK
Wire panel: crafting with children.
Wire panel
This wire panel was made and sent to ours by Tatyana Yuryevna Kulabukhova and Eldar Kulabukhov (6 years old) from Petrozavodsk.
Wire panel: materials
2. Bugles
3. Copper wire
4. Cardboard, colored paper
5. Needle and thread or textile glue.
Wire panel: manufacturing stages
Step 1. Prepare the background.
We cover the cardboard with colored or bright wrapping paper. You can use fabric.
Step 2. We make an outline - the basis of the panel drawing.
We create the outline of a maple leaf from wire. An adult carefully beats it with a hammer, flattening the surface of the outline of the sheet from wire.
Step 3. Decorate with beads and bugles.
We create the internal space of the sheet by stringing glass beads onto separate pieces of wire and attaching them to the contour of the sheet. We frame the outline of the sheet with beads.
Step 4. Attaching to the background
We attach the finished maple sheets to the background using a needle and thread or textile glue.
This is what you get.


You will find more ideas for children's creativity and step-by-step master classes in the section of the site
Get a NEW FREE AUDIO COURSE WITH GAME APPLICATION
"Speech development from 0 to 7 years: what is important to know and what to do. Cheat sheet for parents"
Click on or on the course cover below to free subscription

The lesson is devoted to creating drawings from cut multi-colored copper wire.
You will need:
1. patience first of all 2. base, preferably plywood of the required size 3. a lot of thin copper wire, as many different shades as possible 4. Thick copper wire with a diameter of about 1mm

5. PVA glue, glue type 88 6. Scissors, wire bending pliers

7. Zapon varnish (and dyes) 8. Brushes
So, first, we decide what we want to depict and draw a sketch on the plywood.

Then glue a thick wire along the contours of the drawing

For gluing, it is better to use glue that does not dry too quickly. I used glue 88 You can use super glue, but it is more expensive and you need a lot of it. In principle, you can simultaneously start filling in the fine wire and finishing the outline; I only used scissors for cutting (I couldn’t think of other faster ways) this is what it looks like when cut


After this, I cover small areas of the picture with an evenly thin layer of PVA, and cover them with the required color, trying to sprinkle it so that the wire does not fall into areas that will be of other colors, and in quantity so that it hides the layer of PVA glue.
There is almost no photograph left from this stage, but in the end it looks something like this

in the picture, the leaves have not yet been filled in, and you can see a white spot on the left, this is not yet dried glue.
You can glue rhinestones in the right places. close up it looks like this


In order to get different colors, I used tsapon varnish with a small amount of ballpoint pen paste of the desired color (for example, green and blue), but this varnish is better used on white copper wire (it is white because it is covered with a thin layer of tin) I also used nail polish, ink for refilling felt-tip pens. At the end there are several finished works; this technique is not new in principle, but I have never seen such lessons. All photographs and pictures in the lesson are your own.


Wire and its varieties can be used both in the manufacture of some decorative products and in independent form. Due to its flexibility, crafts made from this material are accessible even to schoolchildren, and the rich variety of types allows the imagination to run wild. We'll learn how to start making simple crafts using different types of wire.
Chenille wire animals
To determine which wire to use for a craft, you need to start from the age of the child taking part in the creative process and what you are going to do.

To create animals, fluffy colored wire is suitable, which is popular with young children; it is flexible and not brittle. Start by forming a small ball at the end of the wire, then wrap the next section around a pen or marker and continue as a squiggle tail, pulling out the stationery.

Cut two small pieces and bend them at the ends of the legs, then attach them to the body. The color and shape of the figure will determine the type of animal; stick eyes on the muzzle. You can make plastic people and other interesting things from this funny wire.


Copper wire horse
Cut two pieces of wire, one longer than the other. The short one will serve as the legs when we bend it at an angle, and the long one will take on the topography of the horse, including the side of the head.


We wrap the entire body of the horse with wire in a colored sheath, ring to ring, close to each other. In the areas of the hooves, the wire is wound repeatedly in a thick layer so that the animal is stable. Using the same principle, you can make other animals by finding photos of crafts on the Internet.

Flower
This DIY wire craft is original and not as simple as the previous ones. First, a paste is made from starch and cotton pads are dipped into it.

After drying, we paint, cut out the petals and fasten several pieces together, highlighting the core with yellow and white paint, which will then be occupied by a piece of cotton wool. A stem is made from wire, wrapped with green tape or tape, leaves are added and secured to the flower.

Tree
Using pliers, solid wire and beads you can create amazing jewelry. Having twisted several pieces of thick wire into a spiral trunk, we take them out into graceful branches. They can intertwine with each other, and then grow separately, giving the tree a spreading appearance.


Red fruit beads appear in the loops, oblong green bugle beads cover the strong branches with thick foliage. It is important to firmly strengthen the rhizome of the tree in a flowerpot with pebbles.


Oil burner
This specimen is not the lightest, but it is the most functional; we will try to tell you detailed instructions on how to produce a useful item from wire.

We bend a circle from thick wire and solder its ends with a soldering iron. On this base we solder five equal pieces of medium-thick wire at equal distances and bend it slightly in the middle. Then we bring the ends together to one point and solder them to the base of the floor lamp, a circle made of thick wire.

From a metal plate we make a bowl and a side with an indentation of zero point five millimeters. Now, for the upper part, we make four squares of different sizes from medium-thick wire, and cut four identical pieces from the same wire.

Solder a short piece of wire at an angle to the largest square, a slightly smaller square onto it, and so on. We make a circle from the middle wire, and attach it to the last smallest square on the legs from the same wire.

We cover all parts of the lamp with silver spray paint. Then we pass thin copper wire along the entire body of the floor lamp and weave beautiful large beads into the pattern, at the same time connecting the two parts.


Vase
Take a wire that is not too thick and elastic and a deep plate. Attach one end of the wire to the bottom of the container and begin to wrap around the outside of the container. This can be done either chaotically or by pursuing a special pattern.

After the entire outside of the plate is covered with wire, secure the other end with the first by twisting them together several times and masking the knot between adjacent lines. Remove the plate and line the resulting fruit and sweets bowl.

Figures and decorations
By twisting thick wire with round-nose pliers, you can create a mysterious frame for unusual bottles, jugs or vases. Also mesmerizing are the jewelry made of copper wire, which seem to hold precious stones in their paws, wrapping their hands around the wrist, finger or ear like a snake.


Such handmade jewelry is filled with pleasant energy and will always be an exclusive addition to your look.

Trees, animals, mythical creatures, abstract figures can become holders for jewelry and jewelry, keys, business cards, tools and gadgets, and making crafts from wire will become a favorite pastime for children and adults, if you do not limit your imagination and use your favorite images.

Photos of wire crafts


I made wire crafts with my own hands when I was a child. Together with my friends, we twisted rings from multi-colored wire, made “money trees,” and together with my dad, we assembled a Christmas tree from wire and shiny tinsel for a school party. We made our first wire craft for our son as soon as he entered kindergarten. In this article I will try to reveal the attractiveness and simplicity of an unusual technique of applied creative work.
Wire for a beginner
If you have never used wire for decorative purposes, twisted it into intricate shapes, or invented an intricate frame for toy furniture, then you will have to start small. Buy copper wire in a skein for bead crafts. This material can be purchased at any craft store. A tool for working with any wire is similar to pliers with an elongated nose. It's called round pliers.  Crafts made from copper wire can be made with children aged five, when the arm muscles have become stronger and some perseverance has appeared. It is enough to explain the principles of operation and control at the initial stage.

 There are plenty of sketches for working with copper wire on the Internet. Many fakes made from this material can be safely used in the design of a children's room. For example, a garland woven from copper wire can be a good decoration for a child’s room.

Using copper wire, beads and beads, you can decorate photo frames, flower pots or wall clocks. Small crafts made from copper wire can fill the calendar planning space or the daily routine of a first-grader. The most important thing is that the child will find it interesting and easy to work with such wire.

Working with different types of wire
After you have mastered thin wire for creativity, it’s time to move on to more elastic and deformation-resistant materials. For example, creating crafts from wire with a multi-layer coating and a larger diameter than a copper coil.


Master Hanka Sladka, Czech Republic
Working with elastic wires will be interesting for older children. To work with this material you will need curved pliers and a vice handle. If you plan to place the finished product on a support, do not forget to purchase a set of special pins. For those who have mastered the technique of working with wire, you can use a variety of devices to create patterns and decorations.

Decor pendant. Master Irina Sergeeva, Rostov-on-Don
Wire decor in the interior of a children's room
Several years ago, a student gave me a candlestick that he made from wire. The base of the product resembled a curved tree trunk; the vase for the candle was made in the shape of a blossoming tulip. Thick threads of reinforced wire were interspersed with a thin weave of wire with multi-colored beads.  Then he came up with a good idea for joint creativity with my son. Defender of the Fatherland Day was approaching and it was necessary to “figure out” a craft for school. The son wished that it should be a star. And I suggested making the frame of the star from thick wire that was left over from the old equipment. Additionally, I bought thin wire and red beads. My husband assembled the frame of the star, and my son and I braided the product with beaded “ivy.” The craft was highly praised at school.

I liked the idea of decorating the walls with wire and beadwork. Flat figurines of birds, fish, butterflies or animals, paintings using architectural solutions. Black wire patterns and contour processing of decorative elements.


Angels for the nursery of a younger brother or sister, Christmas trees for the window in the nursery, a funny clock or an original night light made of wire - all this will occupy the child and decorate the house. Pendants made from wire and bright beads can complement the interior of a child's room for a newborn, training the child's vision and shaping his aesthetic taste. 

Pendant “Angel”. Master Polina Tar, Nizhny Novgorod

A wire clock looks unusual and very entertaining in a child's room. They can be created using the winding technique and pins for the base, and the mechanism can be borrowed from an old alarm clock.

Wire watch. Master Hanka Sladka, Czech Republic
It also seems to me that it would be nice to knit a large panel from wire under a photo chronicling the life of a child, hang it in the nursery and update the photo within a certain framework.  An interesting solution for decorating the interior of a children's room would be original flower pots or intricate wire bookshelves. Children really love different jars for pencils, bags for toys or wallets for small parts. If you use hooks made by yourself from wire to organize storage space, the interior of the children's room will significantly change.


Wire is also used to make lampshades for a night light and chandeliers for a child’s room, designer furniture for dolls or garages for toy cars. The most amazing thing is that all this can and should be invented and brought to life together with children. 

There are amazing wire weaving techniques that create real wire sculptures.

American designer, Ruth Jensen creates realistic animal figures using a single skein of wire. In other words, made from solid material.

Wire cat. Designer Ruth Jensen
Children are interested in working with wire. By bending fancy patterns and creating intricate figures, the child learns to create and apply his imagination to crafts. The result is not long in coming. Wire products are liked by others and stimulate further creativity.  After all, by inventing intricate wire crafts with his own hands, a child not only develops his fingers, he trains his imagination, is involved in an active creative search and shows his individuality to the delight of his parents, friends and loved ones.
String Art is a fairly popular and unusual art that allows you to combine seemingly incompatible things: soft threads and hard nails. As a matter of fact, that’s what it’s called - the art of creating pictures from nails and threads.
Historical reference
When translated from English, the word "String" means "rope", or "string", or "tension". Accordingly, String Art is thread art or. Isothread is embroidery on cardboard, that is, on a hard surface, and String Art is already an interweaving of threads on nails.

String Art is not a new creation at all, but it is very famous due to its beauty and originality!
 This art came from England. Four centuries ago, English weavers used nails and thread to decorate their homes in this way. They drove nails into wooden planks and pulled threads onto them in a certain sequence. This is how openwork products for wall decoration were obtained.
Then the invented thread weaving technique was transformed and improved with the help of the English researcher Mary Bull. With the help of threads and nails, she taught children algebra and geometry, and thus the string art technique from Mary Bull appeared.
We invite you to watch a short tour of the String Art technique and a master class by Diana Kiseleva:
Materials and tools for String Art
To create your first painting using the String Art technique, check out the list of necessary materials and tools:
First of all, choose a wooden, cork or cardboard basis on which you are going to place the drawing. In rare cases, foam plastic or thick cardboard is used (these materials are ideal for mastering thread weaving with children).

Basis for String Art


Sandpaper necessary to clean the base for the panel.
Hammer(to drive nails) and directly yourself nails(furniture, carpentry or any other decorative nails are suitable).
There must be a lot of them! Even for the smallest picture you need to prepare at least 20 cloves

Dye, varnish or adhesive film are useful if you need to add color to the base.
When using plywood or a wooden base for painting, a water-based stain is ideal

Threads for winding(knitting threads are ideal in terms of density and color range, but you can also use floss, iris, and twisted threads).
It is important that the threads are strong(!), this will make your work easier, because during the weaving process you will not have to tie up broken threads!

Paper template with pattern(or dot pattern). You can download it on the Internet, buy a ready-made diagram in a store, draw it yourself, or take a ready-made image and apply a bitmap to it yourself.
YOU WILL NEED IT
To create a picture from nails and threads, download the templates and diagrams collected in. It's free)

Pen without rod or another narrowed cavity for more convenient winding of threads (can make the pulling process easier).
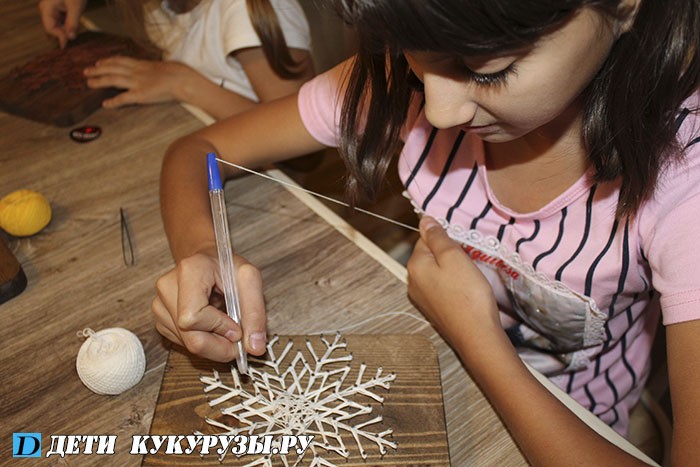
See how quickly you can wind threads using this simple tool:
Scissors, pliers(they will help if the nail is driven in the wrong place).

Anna art tells how and from what paintings in the style of String Art are made, where to buy materials for String Art:
How is String Art useful?
If you decide to make a picture from nails and threads with your own hands, then you will need a lot of patience, attentiveness and perseverance. But the results are worth it: decor using the String Art technique looks very stylish!


Various panels and paintings made in this style will decorate any interior, be it a cozy cafe, kitchen or other room.


Such a homemade gift will surprise and delight anyone, since you definitely cannot buy such a product in a souvenir shop.

Each of us is exposed to various stresses every day: at work, at home, in the family. Weaving from threads and nails has a calming effect on the psyche; this type of art is included in the list of art therapy techniques.

Therefore, as a result of doing crafts in this style, you will not only receive enormous aesthetic pleasure, but will also have a beneficial effect on your emotional health!

Basic techniques: angle, circle, circle, arc
Mastering the art of creating pictures from nails and threads starts with learning the basic principles of filling an angle and a circle. All other shapes (circle, oval, square) are derivatives.

To practice your skills, you can draw a right angle on paper (side lengths 10 and 5 centimeters). Divide the long strip into 10 equal parts of 1 centimeter each and number each of them. Divide the short strip into 10 smaller parts and also number them. This way you will prepare a mini-scheme for yourself. Next, you begin to work with the thread: lead it from one point to another (see diagram below):

After this, you can similarly practice your skills in working with a circle and then proceed to crafts using the String Art technique that are more complex.

We invite you to hone your skills by making a round panel using threads of different colors. Master class by Diônatan Bertelli.
Here's a great example of filling an arc:

Additionally, I would like to note that it is not necessary to strictly follow the rules described above for filling out corners, circles and other shapes.
String Art also allows for arbitrary winding of threads on nails.
You can draw the drawing template yourself. It's better to start with simple drawings:


Features of weaving from nails and threads
When making products using the String Art technique, we would like to draw your attention to the following points.
How to drive nails deep
The nails must be carefully driven in along the perimeter of the pattern to the length of the nail at which it will be convenient for you to wind the threads.
The more multi-layered and voluminous the pattern, the higher the hammered nails should stick out. The height of the nails may vary depending on the intended design.
In order to drive nails to the same length, you can use pliers, that is, hold the nail you are driving with them. So the fingers will be intact and the nails will be driven in the same way.

It is more advisable to use pliers when driving nails
Whether or not to drive the nails in deeper after the pattern has already been wound depends on your aesthetic perception of the panel.
How to change thread color
When starting to wind threads on nails, tie the first thread to the first nail and begin winding work. When you need to change this thread to a different color, be sure to tie a knot on a nail, thereby securing the design you have made. Next, do the same with the new thread: a knot at the beginning of the work, a knot at the end. At the end of the work, do not forget to carefully trim and hide all excess. All this is clearly presented in the MK:
Methods for filling a pattern with threads
Using the same template, you can make completely different paintings from nails and threads.

When the nails are already placed on the base, i.e. you have a dotted pattern ready, you can wind the threads, filling the pattern itself with them:

Filling out the drawing...
Or you can fill the background with threads, as if enveloping the drawing itself.

...or the background around
The third option could be to fill both the background and the pattern with threads of different colors. A combination of contrasting threads will look especially impressive.

Methods for winding threads onto a heart pattern can be as follows:


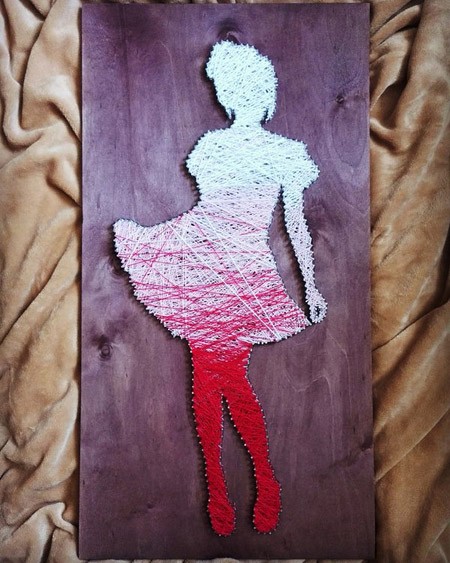
Thin sewing threads in spools can be used in the work, then the picture turns out incredibly elegant and light:

If you take thick threads like Iris and wind them in a dense layer, you can achieve the effect of full volume:


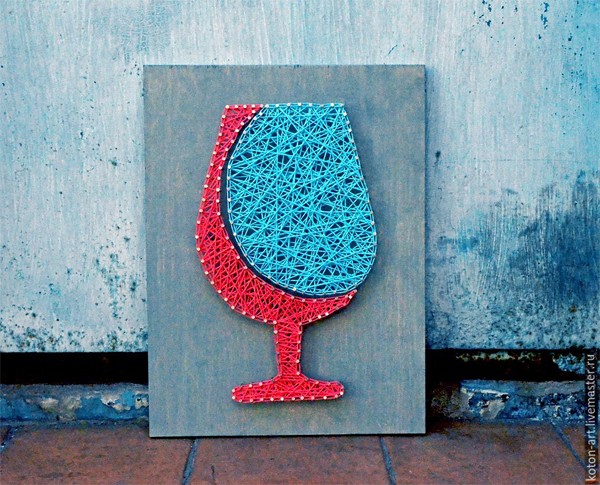
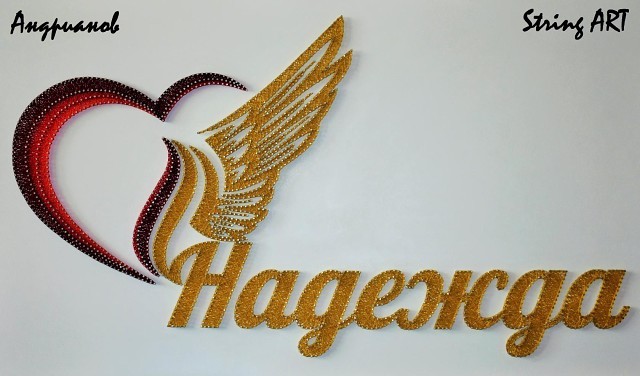
The main design can be decorated with edging. The edging should be done after filling the “body” of the design, winding threads of the same or a different color in a “snake” pattern along the contour of the design. In this case, the yellow border adorns the blue letters:

How to make a picture using different colors of thread, and then complement it with edging in a contrasting color, can be seen in this MK:
The sequence of creating multilayer compositions
Let's look at how to make a complex pattern using several colors of thread using this red fox as an example.

To weave it you will need three colors: red, white and blue. The sequence of winding threads is as follows. First we weave a fox body from red and white threads. We braid the outline of the fox with red threads, we also braid the white cheeks on top with red color. We braid the outline of the white tip of the tail with white threads on top. At the end we weave blue eyes, which we also braid on top with blue threads. Lisa is ready!
These little animals are made using the same principle:

Using multi-layered threading, you can make such a seahorse. First fill in the “body” of the skate, then overlapping the top you can make a pattern like this on it.

Continuing to play with threads, you can make the following intricate color transitions:


Threads and nails can do a lot!
You can make a multi-layer painting from threads and nails without a base, but using a wooden frame or frame. In this case, a nail gun will help make your work easier. Let's watch MK:
Letter Design Combined with String Art
Letter design is a long-known interior trend; it was introduced by Western designers. Letters, words, phrases - all these elements are quite appropriate in decor, and in combination with threads and nails they turn into stylish voluminous home decorations.

Absolutely any letters on the wall will enliven the interior! And if they form a word, for example, a meaningful “OK” - that’s even better)
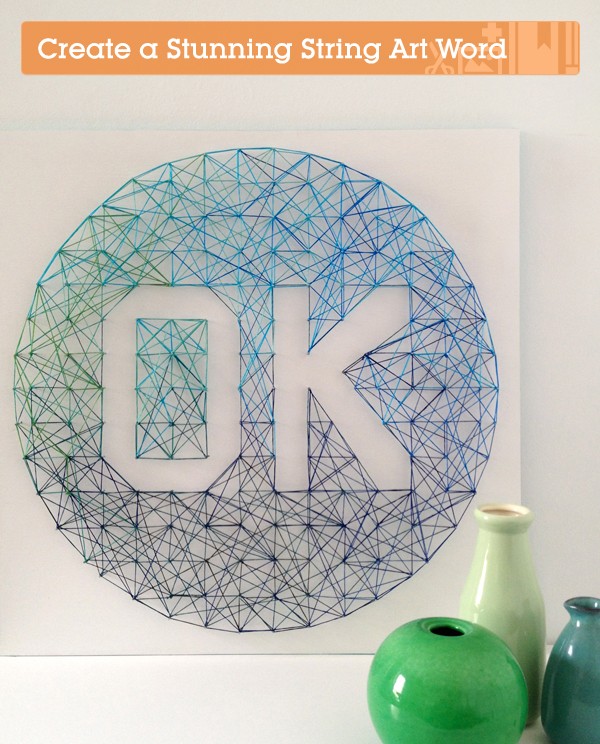
For a step-by-step master class on creating such a picture, see the link, where you can download a free template with letters.
The original master class is in English, so for your convenience we offer a brief translation of the process of creating this painting.
Materials and tools are standard: blue threads, brush, hammer, scissors, nails, dotted sketch on paper, tape.
Print the templates, glue the word from A4 sheets. Place the sketch on the base and drive nails into the points on the drawing. Remove the sketch from the base.
Tie a knot on the first nail and start winding the thread around the perimeter of the design (letters “OK”).

Next, wind the threads around the resulting letters, gradually filling the background. You can wind the thread randomly, or you can wind it in a certain specified order. Don't forget to change the color of the threads according to the chosen color scheme!

This composition is made according to the same principle. The marine theme in letter-string design will appeal to everyone who loves the delicate color combination of blue and white)

Such a heartfelt personalized gift will definitely pleasantly surprise)
A bright accent in a delicate children's room can be given by a panel with a very important word on it!) An alternative could be a similar panel with the name of the owner of the room or other warm words)
Despite the sharp nails, the String Art style can be very gentle)

Tenderness is in hardness

How do you like such a bright greeting in the living room?)

Or a soulful picture in the hallway:


As they say “Don’t worry – be happy!” String Art will help bring positivity into every home!)

String Art for children
The art of weaving is very useful to practice with your child. Weaving with threads will instill in him attentiveness and perseverance, give him an idea of complex geometric shapes and develop fine motor skills, and simply introduce him to beauty!)
Start weaving using foam as a base. It has a soft texture that will easily allow your child to insert carnations into it.
Do not pull the threads on the foam base too tightly, as the nails may pop out and the entire composition will collapse.

With your help, a child can wind very simple, but at the same time cute things:


Please note that nail heads can be painted to match the thread color. You can use, for example, nail polish.


You won’t find such a piggy bank like this!)

Boys can make a picture with their favorite hero, for example, Spider-Man or Stormtrooper. Art String Art keeps up with the times!

Spider-Man...

...and an Imperial stormtrooper
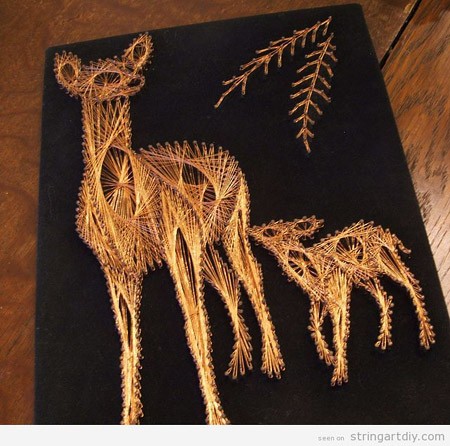
Animalism in String Art
Very often, using the technique of weaving from threads and nails, various animals and birds are depicted. Animalism, as a decorative trend, never goes out of fashion, so such products are always relevant.
It won’t be too difficult to make such an elegant deer yourself, especially since you will need one or two colors of thread, nails, and a contrasting base.


You can make an original picture in the form of a horse's profile using thick threads. Studs and a piece of leather will complement the image of the horse.

A stripe is black, a stripe is white – and a spectacular zebra is ready! For this you will need a white base, carnations and black threads, it looks very stylish!

These small birds of different colors can decorate the interior of a nursery!)

The elephant in many nations means wisdom, strength and prudence. A serious, big-nosed friend with tusks is a wonderful present for a serious man’s office!)

A thoughtful monkey and cute roe deer - these works were made by real masters of their craft!

“Fish looks for where it’s deeper, man looks for where it’s better” - with these words you can give a panel like this with a fish!)

The theme of Africa is still relevant and colorful. What do you think of the triptych idea?
A wolf against the backdrop of the mesmerizing Moon will not go unnoticed if it “settles”, for example, in the living room of an avid bachelor:

Portraits woven from threads and nails
The technique of weaving String Art fascinates many people, they begin to do it professionally: they make products for sale, perform huge works with which they participate in competitions and exhibitions. Of course, such skill is very difficult to achieve, but it is this scale, this scope that is especially impressive!

Do you recognize the portraits of idols?!)


Using the example of Justin Timberlake's portrait, you can see how such grandiose works are made (video from the wearts ru channel):
The directions of String Art creativity are very diverse; this technique is even used in weaving icons:
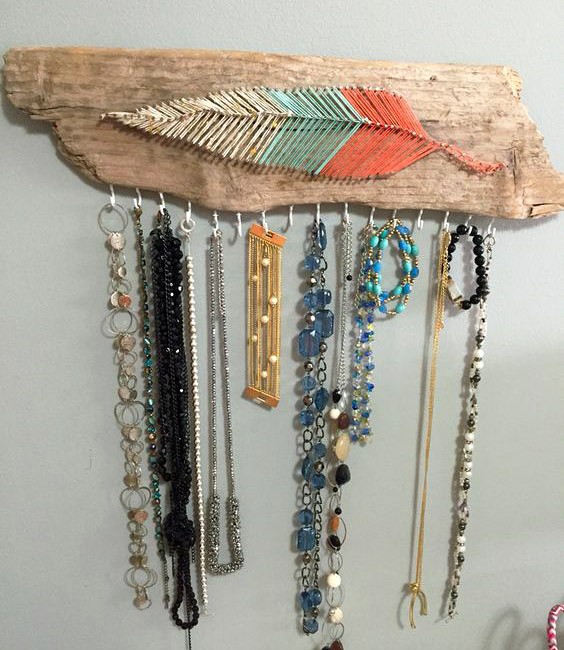
Additional decor of compositions
I would like to say a few words about additional decor that can be used when creating StringArt paintings.
Let's start with the fact that the same product, made in different colors, already looks completely different.

But there are other ways to decorate finished paintings. For example, paintings made using the same template, with the same thread color, will look different if you take nails of different colors:

The work on the left uses steel-colored nails, on the right - black
Also, paintings can be decorated with various elements: jute, flowers, beads, studs, rhinestones, etc.

Decorate with rope...


...and LEDs
Artificial flowers can serve as the central element of the composition, but a vase made using the String Art technique in this case itself acts as an additional decorative element:

A small board, a schematic drawing of a key, nails, threads and small hooks will help you create an original key holder for the hallway:

The key holder can be made more functional and stylish:

When both beauty and functionality are combined in one handmade product, the result is truly worthwhile, unique things!
Moving from simple to complex, you can even create such a luxurious watch! Who would have thought that a watch could be made from threads and nails!)

Maria Smolot suggests making the following wall clock in her MK:
There are a lot of beautiful and incredibly cute products in this video: