How to make a balloon in Minecraft? We make our own surprise ball to decorate the holiday. How to use thread balls.
A flying balloon is perfect for any holiday event. Typically, commercial flying balloons are filled with a light, volatile gas such as helium. It is almost impossible to obtain such gas at home without special equipment. But helium is not the only gas that can be used for such purposes. At home, you can easily obtain hydrogen, which is also suitable.
But here it is worth considering that hydrogen is extremely explosive, so it is undesirable to make more than one ball. In general, the entire experiment must be carried out outside the home and in the open air.
Will need
For the experiment we will need:- - aluminium foil,
- - pipe cleaner (Titanium, Mole) - Caution! Alkali!
- - plastic bottle,
- - bucket with water,
- - rubber ball,
- - funnel,
- - water,
- - etc.
Making a flying ball with your own hands
When conducting the experiment, be sure to use rubber gloves and special glasses to protect your eyes!First of all, roll the kitchen foil into small strips and cut into small pieces. And collect it in a small plastic cup.

We got 7 grams, you can take more foil, the reaction will proceed faster and there will be more hydrogen.

We also take a pipe cleaner (TITANIUM or MOLE) in granules, 19 grams is enough for us. Be careful this is a caustic substance, wear rubber gloves. If you get it on your hands, rinse thoroughly with water.

Next, take a plastic bottle, fill it one-third with water, and lower it into a bucket of cold water. For convenience, we take a funnel and pour our aluminum crumbs and pipe cleaner into the bottle, after which we quickly put the ball on the neck of the bottle so as not to release the hydrogen. It is better to insulate the neck of the bottle with electrical tape.

The reaction begins, the balloon is completely inflated in about 15-20 minutes, the plastic bottle is heated and so that it does not melt from overheating, it is dipped into a bucket of cold water.

As a result of the reaction of aluminum, sodium hydroxide and water, sodium tetrahydroxyaluminate and hydrogen are formed, which inflates our balloon.

When the ball is inflated, we squeeze the bottle so that part of the hydrogen from the bottle goes into the ball, twist the tail tighter and remove the electrical tape, after which we remove the ball from the neck.

We rinse the tail with water; if our balloon is not fully inflated, you can inflate it a little like a regular balloon.

We ask someone to hold the ball and tie the tail tightly.

The ball flies very well and will delight you and your children. To prevent the balloon from deflating in half a day, use a gel for flying balloons, for example, “hi float”.
Conclusion
At the end of the experiment, I would like to add that such a ball will descend to the ground after about 6-12 hours of flight. To increase this time, you can use a special gel, which is sprayed in specialized stores that sell such balls.Be careful: a pipe cleaner (Titanium, Mole) is used to make the ball - this is a caustic alkali, be extremely careful!
Also, do not bring the inflated balloon close to the fire. Otherwise, the hydrogen in the ball will make a loud bang.
Brought into the game "Chemical Update" from Education Edition and we were asked very often "How to make a ball in Minecraft?", that's why we made this little guide.
First of all activate Education Edition in your world or in the window for creating a new world.

To create a ball we need the following:
- Element connector
- Crafting table
- Any dye
- Leash
- Carbon (minimum 30 pieces)
- Hydrogen (minimum 48 pieces)
- Latex (minimum six pieces)

If you play in survival mode, you can get these elements from, for example, wood. The wood needs to be placed in the “Disconnector” block, but there is one BUT!
There appear to be no crafting items for the Lab Bench, Disconnector, Connector, and Element Constructor. So you can only get these blocks through creative mode.
In total, to create one ball you need 30 pieces of carbon and 48 pieces of hydrogen.

Now in the connection creator you need to create Latex, which requires five carbon elements and eight hydrogen elements to craft. For one ball you need six of these latexes.

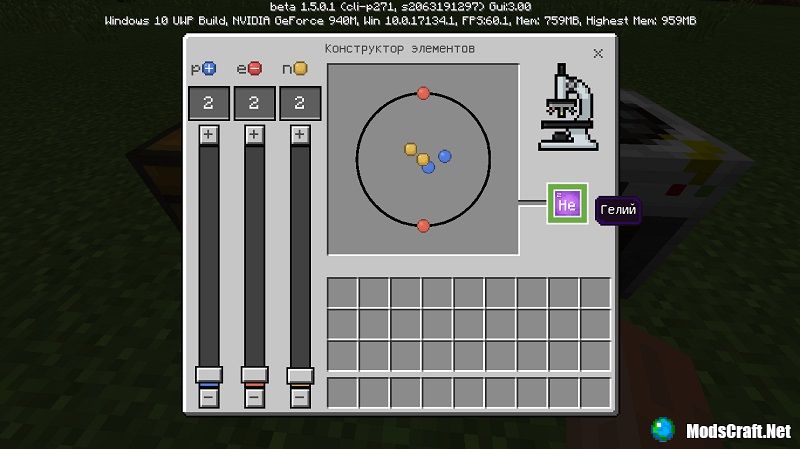
But while I was writing this guide, I came across another problem. To create a balloon you need helium, but I still don’t understand from which block it can be obtained.
So there are two ways to get helium - take it from the inventory in creative mode or create it using the element constructor:
Also, don’t forget about the leash, which can be obtained by crafting (or from the creative mode inventory):

We combine all the elements in the workbench and get a balloon! I used yellow dye and got a yellow ball, but you can also use any other dye.
A party is always great. Decorate your holiday with bright balloons that will fly. Don't worry if you don't have the money or time for helium. At home, you can easily inflate balloons with soda and vinegar.
This will be a visual aid for children simple chemical experiment. And it won’t take much physical effort.
By the way, scientists say that inflating air products is good for the lungs and heart; it burns calories, which means it also helps you lose weight.
But if we are talking not about one specimen, but about ten, twenty or more balls, you will agree that pleasant entertainment will become torment...
Read also:
Soda and vinegar for the ball
It's simple. At the heart of the “magic” - an ordinary chemical reaction when combining acid and sodium bicarbonate. This releases carbon dioxide, which instead of helium helps the ball fly. Everything happens instantly, the result will please you within a few seconds.
Conducting an experiment
We will need:
- vinegar
- balloon
- funnel
- plastic bottle (0.5)

It is important to maintain the correct proportions - the final result depends on this.
Wear gloves! Do not allow small children to prepare the mixture themselves - only under adult supervision!
- Pour 100 ml of vinegar into a plastic bottle. We insert the funnel into the neck, pour 1 tablespoon of soda into it.
- The reaction has just begun. At this time, we put a rubber product on the neck of the bottle. Under the influence of carbon dioxide and heat, our balloon begins to inflate.
- Don't miss the moment when to remove it from the bottle and tie it with thread. Try to launch it upward - it can fly under the ceiling!
Here's how to inflate a balloon using slaked soda. The method is inexpensive, fun and simple. These are the advantages.
However, particles of bite and soda may remain inside the product (so choose a darker color or color it with felt-tip pens). Well, you should only work with vinegar under adult supervision.
These are, to list, the disadvantages.
Everyone has probably seen that they sell balloons in the park in the summer and many people like it when there are many small ones in one big balloon. I'll tell you now how to make a ball in a ball with your own hands at home. Instead of spending money on a purchased ball, you can make it much cheaper yourself. This is very good toy for children, they like this kind of thing. Moreover, the ball in the ball is made very quickly, no extra material is used. Let's learn how to create something similar in this mini master class.
Usually these balloons are used to decorate holidays, especially weddings. You immediately need to buy a pack of smaller balloons. You also need a small, maybe even a baby pump. Let's figure out step by step how and what to do.
First, take a large ball and a small one, insert one into the other, if you can’t do this, then take a pencil and push the small one inside the large one.

We take the pump and inflate the blue balloon, as in the photo, this is the one that is inside. But don’t inflate it too much, just a little bit, since you can put a few inside.

When you have inflated it, you need to pull the tail of the inner ball and make a knot there. Then you can completely push it inside.

Next, using a pencil, insert the red one inside, the second one. In the same way, we inflate it and tie it, pushing it all the way inside.
Then we simply inflate a large balloon using a pump; it turns out to be huge compared to the internal ones.

This is the kind of simple craft we can make, but many people don’t know how to make it with their own hands.

In fact, after the first time it will take you a couple of minutes to create the craft and you will be able to make a lot of balls.
In addition, create or for example. Train your skills and share with me.
Instructions
Launch Adobe Photoshop and create a new file by pressing the hot keys “Ctrl” + “N”. In the “Width” and “Height” fields, enter 200 pixels each, click “OK”.
Fill the document with black by pressing Alt+Backspace. Click the menu item “Filter” > “Rendering” > “Highlight” and set the following settings: “Brightness” - 100%, “Lens Type” - 105 mm. Choose Filter > Distort > Polar Coordinates > Polar to Rectangular > OK. Then click Image > Rotate Image > 180 Degrees > OK. Now click Filter > Distort > Polar Coordinates again, but now set the option to Rectangular to Polar and click OK. The result should be an imitation of a glare on a spherical object.
Select the Elliptical Selection tool (hotkey "M", switch between adjacent tools "Shift" + "M"), hold down "Shift" and create a selection around the sphere. Right-click on the selection and click "Invert Selection" or use the hotkeys "Ctrl" + "Shift" + "I". Press “Alt” + “Backspace” - the area around the sphere will turn black. Press "Ctrl"+"Shift"+"I" to remove the inversion.
Click the key combination “Ctrl” + “Shift” + “N” to create a new layer. Double-click the new layer (defaults to "Layer 1") and name it "Black". Press "D" to make black the foreground color, and then press "Alt"+"Backspace". Hold "Shift", click the right and up buttons, release "Shift". Click "Delete" and then, while holding down "Shift" again, click the down and left arrows. Create another layer, name it "White". Press "X" to make white the foreground color, and then press "Alt" + "Backspace". Click "D" again, hold down the "Shift" key and click the down and left arrows. Release "Shift" and press "Delete". Hold "Shift" again and press the up and right arrows. The result should be that the lower left side of the ball will have the shape of a black crescent, and the upper right side will have a white crescent shape.
Right-click the White layer, then Blending Options > Blending Mode > Overlay. Click the menu item "Filter" > "Blur" > "Gaussian Blur" and set the radius to 4. Activate the "Black" layer, go back to "Filter" and select the very first value, "Gaussian Blur", - the last filter, which you have previously used. The Opacity field is located in the upper right corner of the Layers window, set it to 75%. In this case, the sphere will take on more realistic shapes.
Create a new layer and place it on top of the existing ones. Click on the primary color logo (located in the toolbar), in the very bottom box type “FFFFCC”, click “OK”. To paint the layer with the selected color, press “Alt” + “Backspace”. Similar to the fifth step of the instructions, open the blending modes menu of the newly created layer and select the “Color” option there.
Choose Layers > Layer Style > Outer Glow. Specify the “Blending Mode” - “Lighten”, “Scale” - 10%, “Size” - 51 pixels, leave the other parameters unchanged. Click Layers > Layer Style > Inner Glow. Specify there “Blending Mode” - “Lighten”, “Size” - 29 pixels, the rest of the parameters are unchanged. The result should be a glowing ball.
Open the picture you want to put in the ball: “Ctrl” + “O”, select the file and click “Open”. Click Image > Image Size, enter values in the Width and Height fields up to 130, and then click OK. Activate the Move Tool (hotkey "V") and drag the new image onto the sphere document. Using the same tool, align the image to the center of the sphere. Select "Elliptical Selection" and select the place in the new image that will focus attention. Press the key combination “Shift” + “F6” and set the feather radius to 20. Click “Ctrl” + “Shift” + “I” and then press the “Delete” button to blur the edges. If the corners of the picture are still visible, press “Delete” enough times to hide them.
To save the result, press the “Ctrl” + “Shift” + “S” keys, specify the file name, select the path, set “Jpeg” in the “File type” field and click the “Save” button.