How to make a garland for the New Year. Paper garland for the New Year - cutting templates and diagrams
The New Year holidays will begin very soon. And it’s time to get ready to decorate the house, take out tinsel, Christmas tree decorations, garlands and other familiar decorative elements. But the same type of compositions created year after year can get boring, so you can try to make original and simple crafts with your own hands from scrap materials.
Cotton balls that resemble real snowballs will look very neat and stylish. These delicate and soft products can be used for play, made into a composition, or, by adding a fastener, hung on a Christmas tree.
How to choose a base for blanks
There is cotton wool in every home, so making snowballs from this material will be easy. You can also involve children in making New Year's decorations, turning this activity into an exciting game. There are several ways to make a snowball out of cotton wool. One option: take newspaper or crumpled paper as a base, apply PVA glue to the surface, and wrap the material in several layers. These snowballs will turn out heavy and hard. They are best used for arrangements or as decorations at the bottom of a Christmas tree. Making soft cotton balls requires a little patience and a few readily available materials.

Creating decor from scrap materials
The process of making snowballs from cotton wool with your own hands, step-by-step instructions for which are given below, does not take much time and does not require special preparation. In the central part you can place a padding polyester or a piece of polystyrene foam, an old sock or nylon stocking, or a ball of thread. It doesn’t matter what the base looks like, it still won’t be visible under the cotton wool shell. Therefore, you can use almost any material that is at hand. Of course, it is desirable that the blanks are light or white - then you will not have to worry that the variegated base will begin to show through the top layer. But, if there are no other options, to avoid this, you just need to use more material.

Do-it-yourself cotton wool snowballs: step-by-step instructions
How to make a snowball from cotton wool:
- We prepare the necessary tools - scissors, white thread with a needle, an unnecessary stocking and cotton wool.
- Cut the stocking into pieces.
- You can place unnecessary scraps of fabric inside each piece, and then stitch the material so that you get a spherical blank.
- After this, it is enough to decorate the surface with cotton wool or a bandage and stitch it with white threads so that the craft does not fall apart.
If parents are engaged in making jewelry with their child, it is best to entrust the choice of material and surface treatment to the children, and leave the work with the needle to adults, since it is a dangerous tool, children can get hurt. The finished snowball will look more decorative if you add sparkles or regular Christmas tree tinsel to the cotton wool.
A quick way to make cotton balls
When doing handicrafts with your child, you can use one quick way to make a snowball from cotton wool. For it you will need PVA glue and hairspray with glitter. The technique for creating such a craft is very simple: just drop glue on a piece of cotton wool, roll it into a ball and cover it with hairspray. From such decorative elements you can create a composition, make a snowman, or make a snow garland by stringing balls on a thread.
If you unroll a skein of cotton wool in the form of a sheet, pour glue on it and roll it into a ball, you get a big snowball. The process of making it is very similar to how real lumps of snow are molded. It is also best to decorate the surface of such a ball with hairspray with glitter. It is advisable to use a strong hold varnish.

How to make a snowball using cotton pads
Cotton pads are an affordable and versatile material from which you can create amazing New Year's decorations, including snowmen, Christmas tree decorations, garlands, and the Christmas tree itself. Using a thread, a needle and a little imagination, needlewomen create angels, flowers and decorative panels from these common household items. For snowballs, special blanks in the form of corners are made from cotton pads.
Each circle is folded twice and secured with glue. Then glue is applied to the tips of the resulting corners and they are assembled in 4 pieces. The resulting parts are connected to each other to form a hemisphere. By collecting two hemispheres, you can get a finished openwork snowball.
Cold method of making snowballs
There is another interesting option for making a snowball out of cotton wool. But for it you will need to cook a starch paste. Take 2 teaspoons of starch per glass of cold water and bring to a boil over low heat, stirring constantly to prevent lumps from forming. If this does happen, they can be removed with a fork.
The resulting mass should be cooled so as not to get burned while working. Using a brush, glue is applied to previously prepared cotton balls. It is advisable to spread the glue over their surface in a thin layer, after which the snowball can be dipped in glitter and dried with a hairdryer or on a radiator.

Turning a snowball into a Christmas tree toy
It’s easy enough to turn cotton wool snowballs into Christmas tree decorations if you glue a ribbon or other fastener to them. The surface can also be decorated with bright threads or painted in different colors using ordinary watercolors or gouache. It is enough to dilute the paints of the desired color in water and dip the workpiece in it, then dry it on a sheet of paper.
Cotton pads can also be easily painted with gouache. They can be used to create figures made up of various colored parts. The elements are fastened together using paste, but before painting, it is important to dry all the workpieces thoroughly. This is done so that the paint does not flow.
To create a festive mood for yourself and your loved ones, take the time to decorate your home for the New Year. Together with your children, make your own New Year's decorations.
Option 1
The classic version of the New Year's garland - paper chain. Even very young children can make this New Year's craft.


If you have a figured hole punch, then you can make something like this openwork paper garland chains.


Option 2
To make these paper chains, you only need colored paper and scissors. You will understand how to make them if you look closely at the photo below.

Option 3
1. Cut strips of paper in two different colors. The width of the strips is 2 centimeters, the length is 17 centimeters. In principle, you can use strips of paper of any size, the main thing is to comply with the following condition: width/length = 1/8 + 1 centimeter spare.
2. Fold the strip in half lengthwise to mark the center. Bend it back.
3. Bend the left and right ends of the strip towards the center.
4. Fold the strip in half again.
5. Make the required number of such blanks.

6. Connect the parts of the future New Year's garland together as shown in the photo below.

The garland is ready! Because This New Year's garland bends rather poorly, so it is better not to hang it, but to paste it around the perimeter of interior items.
Option 4
This paper garland can be made not only for the New Year, but also for February 14, and for Valentine's Day.

And here is a more complex version of a New Year's garland made of paper in the shape of hearts.

Option 5


A very easy to make, but at the same time spectacular paper garland. To make it you will need colored paper, scissors and glue (you can use a stapler or tape).


Individual pieces must be fastened together with glue, tape or a stapler. Then hang the resulting paper garlands from the ceiling.
Using a sheet of paper folded in half using the same principle, you can make this beautiful openwork garland.

You can also cut colored paper for Christmas garlands snake in a spiral. Like this:

Option 6
Another very simple way to make a garland is to cut colored cardboard into narrow strips or take plastic strips - bookmarks, which are sold in every stationery store. Using a sewing machine or a regular hand needle, these pieces are placed next to each other and sewn together with thread. A load is attached to one end of the thread - a piece of plasticine, a heavy button, so that the garland does not dangle too much, and at the other end it is suspended vertically, for example, from a chandelier.

Such a garland will look good not only vertically, but also horizontally.

You can sew not only strips of colored paper. Here are more examples of similar New Year's garlands.


There are a few more options, we won’t number them anymore.

Garland from balloons with your own hands:

New Year's garland from snowflakes:


Make an original New Year's Eve from old postcards and family photos. To make it you will need: clothespins, colored ribbon (rope) and postcards, photographs. Bright, beautiful New Year-themed pictures from magazines and the Internet are also suitable.

It’s not at all difficult to make a New Year’s garland from pompoms. Individual pompoms can be hung on the Christmas tree instead of Christmas balls.


Pompoms can be multi-colored.

You can also make a New Year's garland from cotton balls or cotton pads, stringing them on a thread.

Cotton balls or purchased pompoms make a wonderful New Year's decoration for the home - a curtain.

Another option - original New Year's garlands made from pine cones. For beauty, some pine cones can be partially or completely painted with white, gold or silver paint.

Garland from popcorn and cranberries (rowanberries) Looks great on the Christmas tree and in New Year's interior decoration. To make such beauty you will also need a needle and a long thread.

Edible New Year's garlands can also be made from dried fruits (for example, raisins) and breakfast cereals.
How to decorate your home before the holiday, add solemnity and taste to its atmosphere? The easiest and most creative way is to make your own paper garlands. Today there is nothing easier than making jewelry yourself. Even a junior schoolchild can cope with this. On this page you will find a variety of designs for making thematic garlands, as well as interesting templates with which you can cut out an innumerable number of decorations for your home and office.
Paper garlands “Rainbow made of ribbons”

You can hang this garland both vertically and horizontally. In the latter case, it is better to attach a weight, such as plasticine, to the end of the thread.
1. Fold the colored paper in half and cut the halves.
2. Cut strips of colored paper.

3. Prepare the thread and fold your strips in the desired sequence.
4. Sew all the strips together using a sewing machine or thread and needle.

*You can twist the ribbon to make the garland look “fluffy”.
* Colored paper or cardboard can be replaced with wrapping paper, which is usually used to wrap gifts.
* If you don't want to stitch, you can try gluing a thread to each strip - it will take more time and it would be better if the thread was thicker.
Standard garland “Snake”
Even the smallest children, who have barely learned to hold scissors in their hands, can handle making “snakes.” So, if you have kids, keep them occupied with “snakes” and get down to more complex work yourself.
Manufacturing technique: Cut out a large circle from paper and, stepping back a centimeter or two from the edge, begin to cut the ribbon (see photo) until you reach the center. If you still entrust this simple task to a child, it is better to draw in advance with a pencil the lines along which he should cut - this will make the child’s work easier.

Garland “And they dry on a string...”
How do you like this idea: in the middle of the room there is a clothesline, on which old Santa and his faithful reindeer have hung their holiday outfits to dry: red caps, mittens, boots with bells, big pants, a bag... First you will have to sew miniature clothes (you can, of course, get them similar in toy stores, but it will be more expensive), and then secure them with small clothespins (you can use large ones, of course). If you don’t want to bother for a long time, hang your mittens or colorful socks to dry. Or you can have both mixed together. You can simply cut out multi-colored boots from felt or paper and string them on a thread.

How to make a garland "New Year's rings"

This method of making a garland is one of the most popular. This is not only because it is quite simple, but also because it allows you to make beautiful paper decorations for your home, and in particular for your Christmas tree.
1. Prepare colored paper and measure the same width for the strips you will cut.
2. Start cutting out strips. The length of each will be equal to the width of a sheet of paper (i.e. 21 cm) and the width is approximately 3.5 cm.

* You can make a garland from shorter and narrower strips, then the rings will be smaller.
3. Glue the strips together by threading one through the other (see picture).

*You can close the circuit.
Garland “Volume Stars”
Such stars can easily be spun from paper strips one to two centimeters wide. Carefully study the photo instructions and go ahead!


Paper Christmas garlands “Unusual chains”
Prepare colored paper, scissors and glue. Making such a garland is not difficult.
1. To make an unusual chain, you need to fold a sheet of paper in half and draw, for example, one of the shapes shown in the picture.

* In order not to waste a whole sheet of paper on one link, you can cut it into 2 or 4 identical parts, from which you will then cut out the links.
* For convenience, you can make a link template.

2. Cut out the shapes and start gluing them together to form a chain, threading one link through the other.
*The longer you want to make the chain, the more links you will need.
*You can use many different colors to make the garland even more colorful.
How to make a “Chain” garland for home decoration from paper
You can use 2 or more colors.

1. First you need to make a blank. Cut several strips of the same size. In the picture, the stripes are 2 cm wide and 17 cm long.
* It is advisable that you observe the following condition: width/length of strips = 1/8 + 1 cm spare.
2. Mark the center of the strip by folding it in half and then spreading it out.
3. Bend the ends of the strip towards its middle and fold the strip in half again.
4. Prepare several of these blanks to start assembling the garland. The picture shows how to stack the blanks together.

* This garland can be hung on the wall. Due to the fact that it does not bend much, it will be difficult to hang it on the Christmas tree, but it still looks impressive.
Garland of hearts

The pictures contain detailed instructions on how to assemble the garland cordially.


This version of the garland can be complicated, and you will get such a beautiful product.

Garlands for the New Year “Colorful home decoration”

You can use colored paper to make this colorful decoration for your home. It is suitable for both the New Year and any children's holiday.
Prepare colored paper, scissors and glue (you can replace it with a stapler or tape).
The picture shows how to make the blanks.
* It is desirable that the strips have the same width.

Use glue, a stapler or tape to hold the pieces together.
Using the same technology you can make a garland like this. And you can find out how to do everything correctly from the video below the picture.

Volumetric New Year's garland

Here is a fairly simple but very original idea for a garland that can be hung on a window or just somewhere in the house.
The images show step-by-step instructions on how to make a garland.
* In the Christmas tree, the hole through which the thread is threaded is made with a hole punch.


Christmas tree garland “Merry candy wrappers”

Very beautiful tinsel can be made from ordinary candy wrappers.
1. Cut the candy wrapper into several identical pieces.

*Parts can be 2x4 or 3x5, and depending on the size of the wrapper, there can be 3, 4 or 6 parts.
* For convenience, you can make a template that will help make all parts of the tinsel the same size.
2. Start twisting each rectangle into a tube, but do not let go so that it does not unroll.

3. Prepare a thick thread with a needle and start stringing the tubes one by one. The edges of the tubes turn around - this is good, because... the tinsel will turn out fluffy.

4. You can make a knot at the end of the thread so that the tubes do not jump off.
* After stringing all the tubes, turn them in different directions.

New Year's garlands made of paper using the Origami technique

1. We make preparations. For one step of the garland you will need 2 strips of different shades.
* The length of one strip is 21 cm (which is the width of a regular A4 sheet), and the width is 3.5 cm.

2. Start folding the strips sequentially as shown in the picture.

*The final goal is to make two long ribbons that will form a rainbow.
3. We connect the end of one tape to the other at an angle of 90 degrees.

4. Continue folding the strips sequentially - vertical down, horizontal across.
* The circuit can be closed if desired.
Garlands for the New Year (several examples)


Amazing paper garlands
Perhaps the simplest and most popular New Year's garlands that can be made at home, even with the involvement of a child, are paper garlands. For these purposes, it can be used in a wide variety of ways, ranging from ordinary colored sheets to openwork napkins and multi-colored adhesive tapes.

Such decorations are even made in kindergartens and elementary grades, so anyone can handle them. So, you will need paper, scissors and glue. Sheets of paper are cut into strips of equal width (to make this easier, divide the paper in advance using a ruler and pencil).

The cut strips are glued together into one common garland according to the principle of a regular chain, which consists of links. To get something more original, try playing with the shape of the links: making them square or even voluminous, although this will be a little more difficult. It can be made even simpler: colored paper is cut into thin strips, and then they need to be sewn together in the center; usually a machine is used for these purposes, but you can do it manually.

The stripes can be replaced with circles, triangles or any other shapes that come to your mind. By the way, you can use bright felt instead of paper; such products will be more durable. Such decorations, by the way, look very impressive in door or window openings in a vertical position.
Exquisite garlands of snowflakes
One of the main symbols of the New Year is, of course, snowflakes. So why not use them to decorate your own home? Probably each of us remembers from childhood how to cut out beautiful and delicate snowflakes. The more cutouts, the more sophisticated the snowflake will turn out; by the way, especially for this purpose on the Internet you can find a whole lot of patterns that will help you make many different figurines.

Next, we connect each snowflake using a regular thread or silver rain, and then hang it from the ceiling. By the way, such decorations will look more beautiful if there are a lot of them, so it is better to make 5-10 of these garlands, depending on the purpose and place of use.

Garlands made from natural materials
Why throw away tangerine or orange peels when they can easily be used as scrap materials? We cut out cute shapes from the peel, for example, hearts, stars, faces, snowmen, and so on.

Then, using a needle, we string them onto a thread and our decoration is ready! By the way, it will not only transform your home, but will also spread a pleasant citrus aroma throughout it. Instead of peels, you can use apples and ordinary fir cones; sometimes they are painted in some unusual color or simply placed on a thread in their natural form.
The easiest ways to make paper garlands
 It doesn't take much time or effort to decorate your apartment with intricate and whimsical paper decorations. Paper garlands are lightweight and durable, beautiful and affordable. We will tell you about the simplest ways to make garlands that will decorate your life and lift your spirits.
- Templates. To make your work easier, you can use blanks: simply print them and cut them out from a simple landscape sheet of paper.
 These are the New Year's templates you can print and make your own garland.

2. Drawings. If you have basic artistic skills, you can fold a piece of paper several times and then draw the picture you want on it.

3. Garlands of snowflakes. Delicate lace decorations made from plain paper are easy! Use templates or make your own design.

 Use templates to make snowflakes or just use your imagination.

As you have already noticed, there are a lot of ideas, the main thing is to connect the desire to create and, of course, your imagination, which will help you create the most unusual and unique New Year's garlands!
2016-11-25To turn New Year 2019 into a real magical holiday, it is not enough to dress up as Father Frost and Snow Maiden, as well as gather and decorate the table with chic and mouth-watering dishes. A good fairy-tale atmosphere in every home will, of course, be created by the New Year's decor of all rooms. This includes an elegant Christmas tree, and cool pendants on ceilings, windows and walls, balls, lanterns, figurines of animals, snowmen and dogs - since this is an undeniable symbol of the coming year. Everything that you can find in the store on the eve of the celebration will decorate your home in one way or another. However, if you don’t have enough money to buy new products to transform your interior, don’t despair right away. After all, if you really want to, you can create anything with your own hands from various available materials lying around in your closet. For example, it could be a cool bright garland, created quickly and easily even by your children. Whatever you say, it will perfectly highlight the decoration of your home in a matter of seconds. If you don’t know how to do this, then our article will come to your rescue; we will tell you how to make a New Year’s garland with your own hands at home quickly and easily. By engaging in such creativity, you will not only get a lot of pleasure and joy, but also certain skills in the field of needlework. Don’t worry, everything will definitely work out for you, dear friends, because our videos with step-by-step instructions will explain all aspects of the work. So, as they say, no feathers or fluff!
Garland “The Three Little Pigs”
The coming year will be under the auspices of the yellow Pig with the earth element. Traditionally, the symbol of the year should be installed under the Christmas tree, in a sideboard or as a home decoration. Otherwise, there will be no prosperity, good luck and heaps of gifts from the hostess of the year. A garland with the cute faces of Nif-Nif, Naf-Naf and Nuf-Nuf, made by yourself, will be an excellent “bait” for the Pig.
To work you will need:
- thick paper or white cardboard;
- rope or thin braid;
- scissors;
- dry glue stick and hole punch;
- narrow ribbons.
Operating procedure:
- We draw the faces of piglets on thick cardboard or download templates from the Internet;
- The faces should be double-sided, so we make the templates in duplicate and glue the images of the piglets together;
- In the ear of each piglet, using a hole punch, we make a hole through which we stretch a rope or braid;
- Each muzzle should be at the same distance from its neighbor;
- We tie bows on a rope.
Garland of cups
Such a garland will definitely attract the attention of guests and will delight the owners with its original design. The obvious advantages of the product are minimal financial costs and ease of implementation. At the same time, the garland looks simply enchanting - multi-colored flickering lights look great not in doorways, a corridor or a nursery.

To work you will need:
- 20 disposable cups made of white paper or plastic;
- scissors and a simple pencil;
- cardboard and colored paper;
- glitter paper, old patterned wallpaper or scraps of brocade;
- glue that does not leave marks after drying;
- stationery knife, rhinestones and sequins;
- electric New Year's garland.
Operating procedure:

- We make the design of the cups, for which we place the glass on the back side of the cardboard and trace the product with a pencil from one side of the sheet to the other;
- For each of the twenty cups you need to make a separate “suit”. We smear pieces of brocade or wallpaper with glue and press them tightly to the glasses. We smooth out the “dressed” cups and set them aside for several hours until completely dry. When the cups are dry, glue on sequins, rhinestones or beads;
- Using a breadboard knife, make a cutout in the shape of a cross at the bottom of each cup. We put a light bulb from a garland into the resulting hole, and bend the edges of the cardboard petals inward;
- To keep the garland intact until next year, the light bulbs will need to be removed from the cups, the mini-lampshades should be stacked one inside the other and placed in a box.
Garland in eco-style
Pig in oranges is what you need to decorate your apartment or house in New Year's style. Garlands in eco style create an atmosphere of coziness and comfort. In addition, this is an excellent room fragrance, because such garlands are made from citrus fruits, which give a pleasant smell and a New Year's mood.

To work you will need:
- oranges, lemons or limes;
- decorative twine;
- hot glue gun;
- ribbons cut from burlap;
- hole puncher.
Operating procedure:
- cut citrus fruits into slices 4 cm thick;
- place oranges or lemons on a wire rack and dry in the oven at 60 degrees for 5-6 hours;
- use a pistol to make small holes for the braid;
- we thread the braid into the citrus circles and tie burlap braid in the form of bows between them.
Paper garland with fringe and tassels
At first glance, paper garlands are unremarkable. But if you use a little imagination and put in very little effort, you can end up with a real art accessory for the New Year 2019. For example, a garland with fringe and tassels will decorate any interior in the house.

To work you will need:
- multi-colored paper, foil, decoupage sheets or wrapping paper;
- glue gun;
- stapler and scissors;
- twine, ribbons, rope;
- a simple pencil and a ruler.
Operating procedure:
- take colored paper or foil and fold it in half;
- cut along the edge two-thirds of the way;
- Lubricate the middle with glue, put twine, rope or ribbon in the center;
- press hard.
Garland “Funny Snowmen” made of foam plastic

If you are planning to make a New Year's garland with your children, then you will need a simple option. Something like our provided photo idea with Snowmen. In this creative work, your child, and you too, will not feel any problems or difficulties. As for available materials, there will also be no unexpected embarrassments associated with the lack of material or its unreality.
To create you will need:
- small foam balls;
- satin or brocade ribbon;
- white polymer clay;
- acrylic paints in black and orange colors;
- some cosmetic blush;
- paint brush;
- metal ears (fasteners).
Manufacturing process:
- In order to create a cool garland for the New Year 2019 with your own hands quickly and creatively, you first need to treat the foam balls with white polymer clay, giving them the image of a Snowman with a carrot nose.
- When the clay dries, you will need to insert a metal fastener into the base of the ball, as in the photo. This will make it easier for us to hang our satin ribbon pieces in the future.
- We bring to life manufactured fairy-tale characters. Using acrylic paint and a brush, we draw eyes - dots, eyebrows - arches and a mouth.
- As for the carrot nose, we need to decorate it orange.
- The last stage of creativity is the cheeks. To brown them, we need to take cosmetic blush and apply some missing strokes with a brush.
- We string the finished dried products onto a brocade or satin ribbon, the length corresponding to your room. To prevent the snowman balls from moving around, you should tie the metal eyelet with a ribbon when stringing decorative details. That's the whole secret of creating a garland for the New Year 2019 at home. Your imagination should come into play and then unique crafts made with your own hands in a short period of time will appear. We wish you continued success!
New Year's garland made of colored paper "Balls"

A self-made paper garland for the New Year 2019 will not only decorate a room or classroom at school, but will also constantly make you proud of yourself and your personal achievements in the field of home crafts. Look at the photo and remember, did you make anything similar in your time?! If not, then let's try to catch up with our step-by-step master class.
To work you will need:
- colored paper;
- PVA glue;
- scissors;
- elegant thread or rope for a garland.
Process of creation:
- If your kids are interested in our idea, then we want to make you happy right away - creativity will bring you a lot of positive emotions and a minimum of work. In order to begin the DIY process, you will first need to cut many colorful strips of colored paper. Their size will directly affect the volume of future balls. Decide for yourself what kind of crafts you want to see - small or large, and only then start cutting out paper strips. Remember that for one product you will need four multi-colored or plain stripes.
- After you have prepared the required number of paper pieces, you will need to connect them into separate rainbow balls. To do this, take four strips and glue. We place one part on top of the other so that we get a kind of mathematical plus sign, and glue them together.
- When the paper strips are firmly connected, we will need to add two more of these, but on the sides of the plus sign. By adding the missing details, we get what looks like a snowflake.
- Now it’s time to transform this snowflake of ours into a voluminous paper ball. Using PVA glue, we take and fasten the ends of the strips one by one, as shown in the photo earlier. In this way, we gradually form our desired craft with our own hands.
- Having collected all the details and received many bright voluminous balls, we need to secure them on some elegant rope or thread. We thread our crafts onto the chosen fasteners and admire the created garland for the New Year 2019. Such a miracle will perfectly decorate both the rooms in your home, a classroom at school or a group in a kindergarten.
Video tutorial - a garland of colored paper in the shape of flowers
Festive garland made of felt

It is clear that you can make excellent garlands for the New Year 2019 from various kinds of paper with your own hands. They are in no way inferior to store-bought beauties! However, I would also like to mention such a handy material for creativity as felt. Surely you are already familiar with him first-hand. Have you ever made crafts for school or kindergarten with your children? Let's see what unusual things can be created from this dense felt material.
To create you will need:
- felt of different colors (at your discretion);
- decorative red berries;
- scissors;
- buttons;
- threads;
- paper;
- pencil;
- padding polyester;
- thin twine;
- miniature decorative clothespins.
Manufacturing process:
- To begin with, we have to create with our own hands various figures, consisting of each of two elements, on paper, cut them out, and then transfer them to fabric and do the same.
- We sew the finished felt parts together, leaving a little space for the filler - padding polyester. Subsequently, these places are also closed with a needle and thread.
- We do this with all the figures. Ultimately, we will need to sew a loop of thin twine or satin ribbon to the edge of the base of all products for attaching to a future garland. And cover the surface of the crafts themselves with buttons, bows, beads or anything else at your discretion.
- After the creative work we have done, we take thin twine, its length should also correspond to your internal needs, and we decorate it, gradually attaching our felt creations using decorative mini clothespins. Everything should go as in the photo provided above.
- To make our New Year's decor look brighter and more fun, add dry or artificial viburnum berries, rowan berries, catchy floral leaves, beautiful wooden figurines and balls, pine or spruce branches, pine cones, nuts, etc. to the overall background. This is such a wonderful thing we got as a result of painstaking efforts! For New Year 2019, it will coolly decorate any corner in your home.
Cheerful garland of light bulbs

A garland of ordinary glass light bulbs will look quite original and impressive for the New Year 2019. Of course, they should be transformed with your own hands using various additional materials at hand, but believe me, this work is worth it. And the price will pleasantly surprise you, dear friends! Collect all your old light bulbs and get creative.
To work you will need:
- old burnt out light bulbs;
- alcohol to degrease the surface of the light bulb;
- cotton pad;
- artistic acrylic primer;
- foam sponge;
- white acrylic paint;
- hot glue;
- satin ribbons;
- decorative elements: sequins, mirror mosaic, gold stars or anything else of your choice.
Manufacturing process:
- Having chosen a pear-shaped or other shaped light bulb in your home to create a garland, the surface of each must first be treated with ordinary alcohol using a cotton pad.
- Then take an artistic acrylic primer and, using a small foam sponge, apply this mixture to the glass of the light bulb. After completing the work, leave for 30 minutes to dry if the layer is not thick. By the way, the base of the light bulb does not need to be coated with a primer, only the glass surface.
- After the allotted time has passed, we will use white acrylic paint. We apply it with a brush or foam sponge evenly and around the entire perimeter of the primed product. If the paint is applied unevenly in places, it is recommended to repeat the painting steps.
- When our processed product dries, we begin to decorate it for the New Year. For this you can use whatever your heart desires. For us, it will be decor in the form of multi-colored sequins, gold stars, and small decorative mosaics that look like broken glass. Looking at the photo above, we repeat the creation of patterns. To attach small decorations you will need hot glue. It will quickly and reliably fix the transformation elements you have chosen.
- Having completed this “design” work of implementing your ideas with your own hands, you will need to decorate the metal lamp base. We take a satin ribbon and, carefully lubricating it with hot glue, wrap it tightly onto the selected surface. At the same time, do not forget to make a loop at the base of the base for easy hanging on our future garland.
- Having embellished each light bulb and turned it from an ordinary household item into a real masterpiece of art, you need to place them on some kind of string. Thin twine, the same satin ribbon, or something like that will do an excellent job for this purpose.
- To prevent your creations from fidgeting on the rope, you need to secure them by tying each of them with a small knot. If this option confuses you in some way, then purchase miniature decorative clothespins. They will fit perfectly into the bright style of your holiday party.
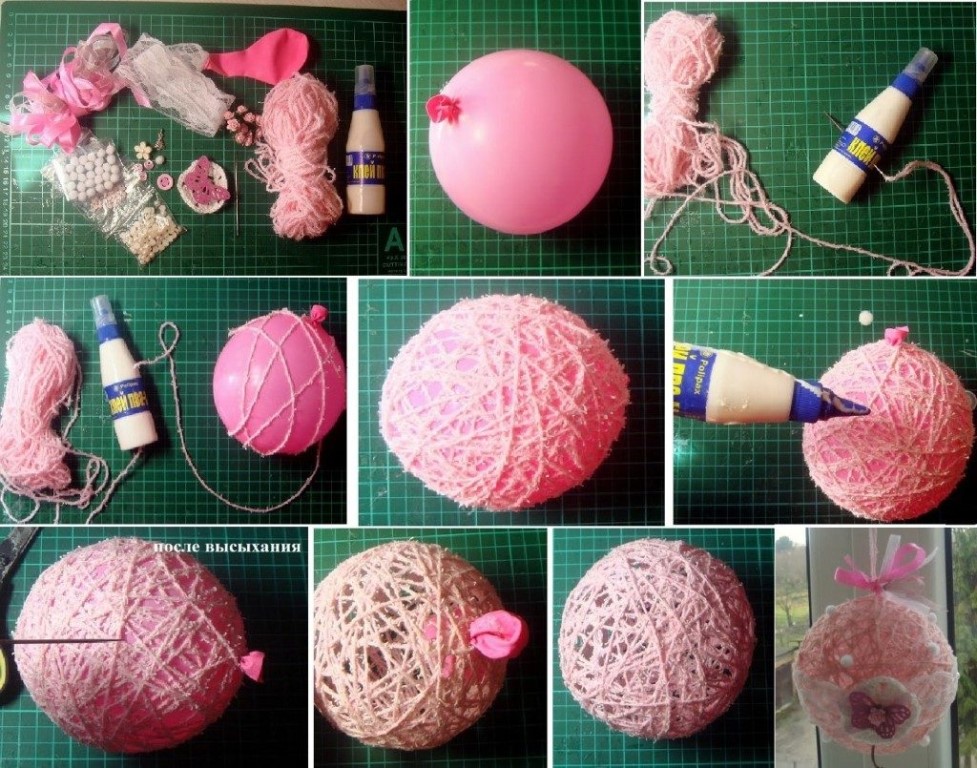
Chic garland of threads - “Balls”

To create a beautiful and light garland with your own hands with your family, you need to use our next photo idea. All your family, and especially your children, will certainly like it. And this is not surprising, because it is not every day that you see such bright and unusual-looking creations in your home. They are so light and airy that even with the slightest breeze they will sway, captivating all eyes. So, let's create such a miracle with our own hands - a product from ordinary floss threads or yarn of the color you like.
To work you will need:
- multi-colored threads;
- inflated round balloons;
- PVA glue;
- clear varnish;
- cream;
- needle;
- wide container for adhesive solution;
- decorative elements: sequins, glitter, snowflakes, satin ribbon bows, etc.;
- old mechanical garland with light bulbs.
Work process:
- We prepare balloons with a diameter of 5 - 7 cm.
- After this, each ball is individually lubricated with a small amount of cream so that its surface becomes slippery and does not allow the wound thread to stick in the future.
- We need to pour the glue from the tube into a shallow, wide container.
- We take a skein of threads of your choice and, passing them through the adhesive base, immediately wind them onto the surface of the balloon. The density of the yarn on our product should be similar to that shown in the photo we presented earlier.
- When it seems to you that there are enough threads on the balloon, cut the thread with a small margin so that you can hang the creation to dry. By the way, if you decide to somehow decorate your work, the time is just right for this. Both rhinestones, sequins, and small ready-made snowflakes purchased in advance at the store will fit perfectly onto the sticky surface of the yarn.
- The hardened surfaces of the thread balls indicate that it is time to remove the air base from each decorative product. To do this, we will take a needle and simply pierce our elastic material with it.
- Now it’s time to place our colorful blanks on the light bulbs of mechanical garlands. We push a festive light into the place where the balloon’s tail was previously. And we do this with every product. Here is a miracle decoration for the New Year 2019, created with your own hands quickly, simply and easily. Lighted bulbs will turn your home into a mysterious world full of surprises and bright colors.
paper chain
A paper chain is the simplest and most common New Year's garland. This decoration will be a wonderful decoration for the New Year holidays. Even a small child can make it.

To make it you will need:
- Colored paper;
- Glue;
- Scissors.
Progress:
- Cut colored paper into strips of equal length and width.
- Make a ring from the strip and fasten it with glue.
- Thread another strip of paper of a different color through the ring. Create a ring.
- Connect the rings in this way, while alternating different colors. It turns out to be a beautiful paper chain.
Ribbon
This garland is attached to the ceiling and simply hangs down. It looks very interesting as a room decoration for the New Year.

Option 1. You need to prepare:
- Colored paper;
- Scissors;
- Glue.
Progress:
- Cut colored paper into strips 5-7cm wide. Everyone should be the same.
- Make equal cuts on the strips every 1 cm, alternating from different sides.
- Glue the edges of the resulting strips to each other to the required length.
- Hang a handmade garland from the ceiling.
Option 2. To work on the garland you will need:

- Colored paper;
- Scissors.
Cut a circle out of paper and gradually cut it into a spiral to the middle. The thickness of the spiral can be made approximately 1-1.5 cm. The garland is hung on the ceiling. You can glue a paper snowman or Christmas tree to the free end of the garland.
New Year's garland of voluminous snowflakes

Such a beautiful garland will become a luxurious New Year's decoration. It will look perfect at home or at work, and will also be a great decoration for a school office.
To create a garland of voluminous snowflakes you need to take:
- A4 paper (color or white);
- Scissors;
- Stapler.
Progress:
- Cut out an equilateral square from paper. Fold it into an isosceles triangle.
- Make cuts from the middle 1.5-2 cm long. leaving approximately 1 cm on the opposite edge.
- Expand the square. The corners of the small square obtained as a result of the cuts are fastened with a stapler.
- Turn over and do the same with the next square in size. In this way, fasten all the corners, alternating sides.
- Fasten the resulting petals together in the middle and at the edge to make a snowflake.
- Use a stapler to connect the snowflakes at two points to each other, you will get a garland of voluminous snowflakes.
Garland of paper balls
Small and neat colored balls, collected on a thread, are a good New Year's decoration. There are several options for creating such garlands. Below are the two most common.

Option 1. To create you will need:
- Scissors;
- Colored paper;
- Threads;
- Glue.
The most difficult thing in making such a garland is creating the balls themselves. In order not to spoil sheets of colored paper, you can practice on a regular newspaper.
- Cut out two blanks from colored paper. They consist of 2 reeds.
- Start weaving 4 tongues, creating a ball shape.
- When the ball is completed, the tabs are attached with glue. Trim off excess.
- Once a sufficient number of balls are ready, string them on a thread.
- The result is a multi-colored and original garland that will decorate a room or a Christmas tree.
Option 2. You need to prepare:

- Colored paper (preferably bright)
- Scissors;
- Glass;
- Pencil;
- Threads;
- Sewing machine.
Progress:
- On colored paper, tracing the glass, draw circles (future elements of the garland);
- Carefully cut.
- You can take 6 circles or more per ball. Fold in the color combination you like best.
- Using a sewing machine, sew a stack in the middle of the circle. At the end of the circle, without interrupting the stitching, continue stitching the elements.
- When finished, fold each circle in half. You will get a lot of voluminous balls tightly tied with thread.
The beautiful garland is ready. You can safely decorate a classroom, apartment or group in kindergarten with it.
A garland of popcorn and cranberries will look original on the Christmas tree and will be an excellent New Year's decoration. And most importantly, creating such a garland always brings joy and fun.

Experts say that the process of making garlands for the New Year 2019 with your own hands brings people together, and the resulting crafts bring good luck to the house. Whether it’s true or not, the most interesting DIY New Year’s garlands will definitely decorate your home or an exhibition in a kindergarten/school.
The choice of options is incredibly large; you just need to decide how this or that garland will fit the overall idea and home.

In this selection of photo master classes, we provided the most interesting ideas and useful information, trying to approach the topic from the perspective of saving time and achieving maximum effect. Such garlands can be used both to decorate the Christmas tree and to decorate the New Year's interior.
 Photo: Felt garland
  Photo
Photo DIY paper garlands
Options for such garlands vary in the degree of complexity of execution; you can choose one to suit every taste. Even the simplest option for making a paper garland will allow you to get an elegant, bright and spectacular decoration for your home and Christmas tree.


We offer, however, several and more complex options, because we will need more than one or two garlands to decorate the Christmas tree, as well as the general interior.


Asterisks
To make this garland, you will not only need double-sided colored paper of different colors.
Manufacturing:
- We cut small squares from colored paper, the size of which we choose as desired.

- We fold each square in half and cut it, and begin to roll the resulting strip in a certain way.

- we bend one corner from each edge to the middle of the strip, we get a triangle;


- bend the triangle in half with the solid side inward;

- straighten the triangle, we have outlined a line for the height of the triangle;

- we bend the sharp corners of the triangle to the height line at an angle, we have another small triangle at the bottom;

- we mark the resulting triangle with clear creases, also bending it in half and marking its height;

- straighten the bent ends of the large triangle and bend it to the height of the small one;


- we make five such parts and insert one into the other with a small bent triangle upward;

- bend each new side to the first part;
- Having connected all five blanks, we press down the entire structure with our fingers to form clearer creases, then slightly unravel and connect the ends of the star;


- Using a needle and thick thread, we string all the stars in the middle, we get a bright, spectacular garland of very simple design.


From napkins
We choose the size of the elements of the garland for the New Year 2019 and the degree of their “fluffiness” according to our wishes, as well as the combination of colors.

Prepare:
- paper napkins of different colors (you can also use double-layer serving napkins);
- stapler;
- a needle with a thick thread - the basis of the garland.
DIY production:
- We fold the napkins as they are, without unfolding them, placing two or three pieces on top of one another and folding them.


- We secure each stack with a stapler in the middle.

- Using scissors, we round the corners of the napkins, achieving a circle of the desired diameter.

- We bend each layer of napkins to the top and slightly compress them, adding volume to the entire structure.


- We string all the fluffy multi-colored pompoms from napkins onto the prepared thread, the spectacular garland is ready.

Read also

From fans
A very simple way to create a colorful New Year's garland with your own hands in 2019. You can make elements for it in different sizes, which will give you an even more impressive option. We offer two photos of a master class on making a garland of paper fans.


Prepare:
- colored paper;
- glue.

DIY production:
- We fold each sheet of colored double-sided paper like an accordion, for which we successively bend it in half twice, and divide the remaining size into three equal parts and bend it twice more.
- Then we straighten the sheet and along the resulting creases, assemble the accordion in the usual way, carefully ironing the folds.

- We fold the resulting accordion in half and glue the inner surfaces together to create a fan.


- We glue the fans, unfolding them relative to each other, and also alternating colors according to the planned plan. The garland is ready, if the fans are small in size, then it will be an excellent decoration for the Christmas tree, and if they are large, then it will be quite suitable for decorating the New Year’s interior.


Garland of round fans
We make a fan as described in the previous master class, then glue four such segments into one round fan.
Another way would be to create a circular fan from cut and glued multi-colored strips of paper.

From these round fans of various sizes and colors, you can create countless compositions for the 2019 New Year's garland.

 Photo: The most interesting garland in 2019
 In addition, you can create multi-layer versions of garlands from round fans of different sizes, placing them two and three on top of each other.
Read also

Instead of a fan of a different size, you can glue Happy New Year letters or any New Year symbol cut out of paper into the center of the main element of the garland.
Garland of balloons
A very interesting option for making decorations with your own hands for the New Year 2019.
Prepare:
- any multi-colored threads;
- inflatable balls;
- PVA glue;
- Bowl.
 Step by step photos
 Manufacturing:
- Threads can be used not only in different colors, but also in different thicknesses, each time getting an unexpected result from the same actions.
- We inflate all the balls, the number of which should be equal to the planned number of balls of thread in the garland you are making.
- Pour PVA glue into a bowl and add a little water.
- We take one ball at a time, tie one end of the thread to the “pimple” formed on the ball, leaving some of it for hanging.
- We wrap the selected threads around the entire ball, making arbitrary movements, but so that the thread does not come off.
- The density of the ball winding also depends on your idea of executing this craft; a sparsely wound thick thread or thin packaging rope looks incredibly elegant.
- After we have wrapped the balls with thread, roll them in a bowl with PVA glue, let the excess glue drip off and hang the balls (in any way) to dry for 24 hours.
- After the balls have dried, we pierce them, then carefully remove them.
- The resulting thread balloons can be decorated with any shiny elements, smeared with glue.
- We use balls as elements to create a New Year's garland, hanging them in any way.


Pasta garland
Such an unusual garland for the New Year 2019, made by yourself, can successfully compete with a traditional garland made of beads - fresh, original and bright!


Prepare:
- curly pasta;
- glue “moment”;
- hanging threads;
- needle with a large eye;
- acrylic paints of different colors;
- acrylic lacquer;
- scissors;
- any sparkles.
Manufacturing:
- We cut the threads to the length you planned, thread each one through a needle and string the pasta according to the intended composition.

- Pasta can be placed either close to each other or at some distance.

- We use glue to secure the pasta to the thread.

- The next step is to apply paint to each element of the garland.
- After the paints have dried, apply acrylic varnish and sprinkle with glitter, use the garland for New Year's interior decor or to decorate the Christmas tree.

Garland of cones
Despite the fact that such a garland is, as they say, a “classic of the genre,” here you can also show your individuality and creative talent by creating your own unique version for the New Year 2019.


Prepare:
- cones of different sizes;
- White paint;
- glitter;
- sponge;
- gloves;
- rope - the basis for the garland;
- snowflakes or other decorative elements;
- hot glue.

DIY production:
- We paint the ends of all cones with white paint, wearing gloves and using a small sponge. If desired, immediately, before the paint has dried, sprinkle the cones with glitter.
- We dry all the prepared cones, then we make a garland out of them using snowflakes or other decorative elements, which we glue to the prepared base rope.
Garland of cardboard toilet paper inserts
This master class shows the technique of making such a simple and effective garland, however, you can bring your own ideas. For example, before you start creating a garland with your own hands, you can paint all the inserts with paint of different colors, and at the final stage, cover them with glue and apply glitter.

Prepare:
- cardboard toilet paper inserts;
- colored paper;
- scissors;
- pencil;
- stapler;
- glue.
Making a New Year's garland:
- We draw each liner into strips and cut them, not reaching the middle by 2 cm.
- We fold the cut insert into a lantern and fasten it with glue, glue a strip of colored paper.
- We connect all the elements of the garland obtained in this way with strips of colored paper, threading them into each element and rolling them into a ring, the garland is ready.
- All that remains is to decorate it at your discretion to get a brighter and more elegant New Year's garland.
Garland of pompoms
Very interesting and unusual!
Prepare:
- knitting threads of several bright colors;
- cardboard;
- scissors;
- plastic bottle caps;
- rope for garland.
Manufacturing:
- We cut out two stencils for pompoms from cardboard, put them together and wrap the prepared yarn in layers.

- Having wound several layers, carefully move the cardboards apart and cut all the threads around the circumference in the center.

- We lay a thread between the cardboards and wrap the bundle of threads several times and tie it.

- We take out the cardboards, connect a bunch of threads, bending them in the center, and secure them with threads.

- We fluff the resulting pompom and adjust its surface using scissors.
- We make a hole in the caps of plastic bottles using any method, thread the threads from the pompoms, and make a knot.

- We tie the finished “lanterns” to a rope for a garland, after which we decorate the Christmas tree or interior.

Garland of cocktail tubes
With these incredibly colorful cocktail tube balls, your ordinary electric garland will take on a stylish, eye-catching look. You can also make a New Year's garland 2019 from only the bright balls made in this master class.


Prepare:
- multi-colored cocktail tubes;
- wire or other material for screeding;
- pliers;
- LED garland;
- scissors.
Manufacturing:
- Cut off the tops with the grooved part from all cocktail tubes.
- We tie a bunch of cocktail tubes in the middle with wire and tighten them thoroughly using pliers.
- We bend the tubes upward, giving the shape of a ball.
- We string balls from tubes onto a rope or attach them to an LED garland and decorate our home for the New Year.
Fabric garland
The most interesting is always the simplest!
Prepare:
- any fabric that does not crumble when cut;
- large two-layer paper napkins for serving with New Year's motifs;
- paper;
- pencil;
- scissors;
- brush;
- a needle with a bright thread that contrasts with the main color;
- rope for garland.

ManufacturingGarlands their hands:
- Using a pencil we draw flag stencils, rectangular and triangular. On a rectangular stencil, cut out a small triangle from the bottom, characteristic of a flag.
- We place the stencils on the fabric, folded in half so that we get double flags.
- We cut out New Year's motifs from napkins, remove all layers and coat the edges of the flags with PVA glue diluted in half with water.
- We apply the motifs to the halves of the fabric and coat the entire surface of the napkin with the same composition.
- Then, dry the flags coated with the adhesive solution with a hairdryer, and then, after complete drying, iron the flags with an iron, warmed up to maximum, without steam. Iron through parchment paper.

We put all the flags on the prepared rope for the garland, connect the halves and stitch them with bright threads using a wide basting stitch, which in our case will be decorative. Other decorative elements, for example, large beads, can be placed between the flags.
We hope you liked our most interesting and unusual garlands for the New Year, which you can easily make with your own hands in 2019.