How to beautifully decorate a bottle of cognac with your own hands as a gift for a man in a military uniform, a policeman, a hussar, a tuxedo, a photograph, ribbons, sweets, a bouquet of sweets: ideas, design, photos. How to decorate a bottle of cognac with your own hands for a woman? Narya
Beautiful decor of bottles with cognac.
High-quality and expensive cognac can be an excellent gift for a birthday, New Year, February 23 and even an anniversary. True, in order for such a gift not to look banal, you need to try to decorate it beautifully. Our article will tell you how you can quickly and originally decorate a bottle of cognac.
How to beautifully decorate a square bottle of cognac for a military man in a military uniform, policeman, hussar: ideas, design, photos
Photo No. 1 Photo No. 2
 Photo No. 3
 Any man will probably like it if you decorate a bottle of cognac so that it visually resembles a policeman, military man or hussar. Initially, it may seem that only a real needlewoman can make such decor. In fact, all you need to do is correctly and securely fix the sewing tape on the bottle.
So:
- To start, buy approximately 10 m of black tape and 1 m of white.
- In addition, for the final decoration, you will need small steel buttons and stars.
- At the initial stage, you will need to cover the bottle of cognac with cardboard paper
- It must be completely covered; only the neck can remain open.
- The neck will need to be carefully wrapped with white tape and its edges securely fixed with special glue.
- If you plan to make a bottle in the shape of a policeman, then at this stage you will need to cut a tie from black ribbon and fix it on the neck
- Next, we cut the tapes into pieces and begin to form the shoulders of the future military or police officer
- To do this, take the tape in your hands, apply it to the neck of the bottle and form the cutout of the future uniform
- Re-secure everything with glue and wait until the tape sets
- After this, you can begin to fix the remaining ribbons
- They will need to be overlapped, straightening them out as well as possible.
- After the entire bottle is covered with ribbon, you will need to decorate it with buttons and stars
- In addition to this, you will need to make a black circle out of paper and glue it to the top of the neck
How to beautifully decorate a square bottle of cognac for a man in a tuxedo: ideas, design, photos
 Ribbon tuxedo
 Master class on making a paper tuxedo
 Ready-made tuxedo
 Recommendations for making a flower for a boutonniere
 As for such decor, it can be done in two ways. If you wish, you can do the same as we told you a little above. You will also need to take white and black tapes and cover the bottle with them.
You can quite easily follow the same algorithm, just at the initial stage replace the tie with a bow tie, and at the very end decorate the bottle of cognac not with steel buttons and stars, but, for example, with small black buttons and a boutonniere made of artificial flowers.
You can see how to make a flower for a boutonniere in a special master class. If you need to do everything as quickly as possible, then simply make a tuxedo out of paper, and then use glue to fix it on the bottle. The back can be covered with plain black paper.
How to beautifully decorate a bottle of cognac for a man with a photo ideas, design, photo

 Photo No. 1
 Photo No. 2
 Photo No. 3
 Decorating a bottle of cognac with a photograph is the easiest way. All you have to do in this case is choose the most successful photo, adjust its parameters to the size of the bottle, and use glue to fix it in the most visible place. As for further actions, everything will depend on your patience and imagination.
The rest of the bottle can simply be decorated with paints, and the photo itself can be highlighted with a frame made of paper, ribbon or medium-sized beads. You can also use lace, threads of different thicknesses, shells, pebbles and pieces of fabric to decorate the bottle.
How to beautifully decorate a bottle of cognac for a man with ribbons ideas, design, photos

 Photo No. 1
  Photo No. 2
 Satin ribbons are an excellent material for decorating bottles of alcohol. Moreover, this method of decoration is very simple, so anyone can do it if desired.
So:
- Buy satin ribbons in the desired color
- Apply the tape to the neck of the bottle just above the characteristic flare
- Measure a piece of such length that the ends of the tape overlap each other when gluing
- Cut a piece from the main part of the tape and secure everything with glue
- Wait until the glue dries a little and start gluing the bottle further
- To do this, simply lightly overlap the edge of one tape over the other.
- If you want to end up with a pattern in the form of a spikelet, then fix it in the same way as on the neck
- If you want to get perfectly straight lines, then fix the tape in a horizontal position
How to beautifully decorate a bottle of cognac for a man with sweets ideas, design, photos

 Photo No. 1
  Photo No. 2
 Photo No. 3
 If your husband, brother or close friend is the type of man who loves sweets, then he will probably like cognac decorated with sweets. In this case, it is best to choose high-quality chocolates that have the shape of a hemisphere. As practice shows, they are easier to attach to the bottle and do not require reinforced fixation. This design is done in the simplest way. You will need to lubricate the wrapper of the candy with glue, and then carefully fix it on the bottle.
The word carefully means that you need to press the chocolate in such a way that it does not deform and that glue does not get under the wrapper. Candies can be glued in rows, in a spiral, or to imitate a bunch of grapes. Once the bottle is covered, all you have to do is decorate the top. This can be done using a satin ribbon, simply tying it in a lush bow.
How to beautifully decorate a bottle of cognac for a man with a bouquet of sweets: ideas, design, photos

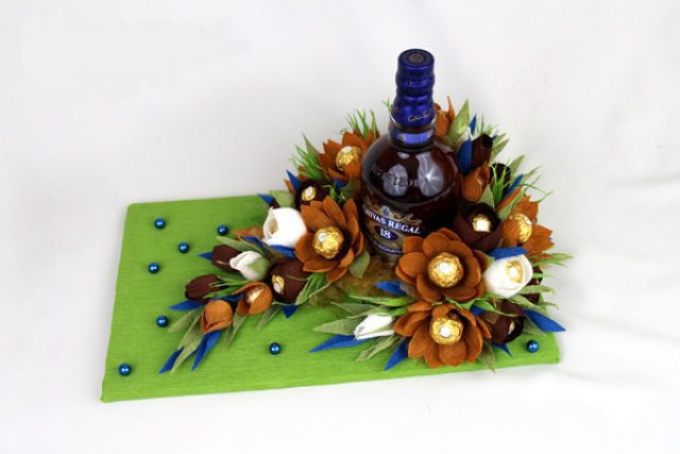 Photo No. 1
 Photo No. 2
 Recommendations for making flowers
 If you want to surprise your loved one even more, then present him with cognac decorated with a bouquet of sweets. Yes, such decor requires more time to produce, but the end result is a very original present.
- First, decide what will play the role of a stand (cardboard, a piece of plywood or just a flat stand plate)
- Next, take a piece of corrugated paper and carefully wrap it around your chosen stand.
- At this stage you can lightly encode it with small beads or paper bows
- At the next stage, start creating a bouquet of candies
- First, make the candy buds yourself, the leaves for them, and only after that assemble the bouquet itself
- Next, take a bottle of cognac, grease its bottom with glue and fix it on the supply
- Do the same with the bouquet.
- After the glue has dried, bend the leaves and buds so that the composition looks as beautiful as possible
How to decorate a bottle of cognac with your own hands for a woman?
 Photo No. 1
 Photo No. 2
 Photo No. 3
 It’s probably not even worth mentioning that women love everything beautiful and original. That is why, in order to decorate a bottle of cognac for a representative of the fair sex, you need to show maximum imagination. For example, you can decorate a bottle with the same bouquet of sweets. But in order to make it clear that you made a present for a woman, you can additionally make a small decorative hat and make an imitation of a royal red robe.
You can see an example of such decor in the picture located a little higher. Another win-win option is thick, bright threads. In this case, you will need to apply a thick layer of glue to the bottle, and then wrap it with thread as carefully as possible. After all this has dried, all you have to do is further decorate the surface.
How to decorate a bottle of cognac for a fisherman man?

 Photo No. 1
 Photo No. 2
 Photo No. 3
 Only a sea or river theme can please a fisherman. That is why it will be better if you use shells, small river pebbles, mesh, fish hooks and bright silicone bait to decorate a bottle of cognac. All this beauty will need to be fixed on the bottle, while creating a composition pleasing to the eye.
If you want to do something as original as possible, then buy the so-called structural paste and apply it in a thin layer over the entire surface of the bottle. Next, take transparent glitter and use it to imitate fish scales. Once it's dry, all you have to do is paint the bottle the color you want and you can decorate it with shells or even dry grass.
How to decorate a bottle of cognac for a man on February 23?

 Photo No. 1
 Photo No. 2
 Photo No. 3
 Since February 23 is a special holiday for men, in this case it is best to abandon decor in the form of flowers, bows and various beads. If you want to emphasize the importance of this present, then make it in an army style, for example, sew an army raincoat and fix it on a bottle of cognac. You can also take corrugated paper and cover the bottle with it, imitating a ceremonial uniform. You can see how to bring all this to life a little higher.
How to decorate a bottle of cognac for a man on his wedding anniversary?

 Photo No. 1
 Photo No. 2
 Photo No. 3
 Decoupage style decor is ideal for a wedding anniversary. This type of finishing is considered budget-friendly because in this case you will only need to buy two-layer napkins with the pattern you want and glue. Yes, and it doesn’t have to be a wedding theme. You can use any drawing that your loved one will surely like.
So:
- Try to understand how the design on the bottle will ultimately be positioned, and cut out the motif accordingly
- Separate the very top part of the napkin from the main mass
- Set the part with the pattern aside, and in the same way prepare several more of the same blanks
- Squeeze some PVA glue into a bowl and dilute it lightly with water
- This must be done, otherwise you will not be able to evenly distribute the pattern on the surface.
- Next, take any brush and apply glue to the bottle
- Carefully apply the design to the greased area and smooth it out using a brush dipped in water.
- Glue all the other blanks to the bottle and let the glue dry
- After drying, the gift can be tinted with acrylic paints
How to decorate a bottle of cognac for a man’s birthday?

 Photo No. 1
 Photo No. 2
 Photo No. 3
 In principle, you can decorate a bottle of cognac for a man’s birthday in any of the ways that we have already introduced you to. If all of them seem very complicated to you, then try decorating it using ordinary paper or fabric. You can see how this can be done in the pictures posted a little higher.
Yes, and remember that you are not required to decorate your gift as shown in the pictures. If you wish, you can add some element of your own, the main thing is that it fits perfectly into the overall color scheme and matches the structure of the other materials.
How to decorate a bottle of cognac for a man for the New Year?
 Christmas tree made of cognac
 Photo No. 1
 Photo No. 2
 The easiest way to decorate a bottle of cognac for the New Year is to make a Christmas tree out of it. However, remember, in order for the gift to visually resemble a forest beauty, the container must have a suitable shape. This means that you will need to find alcohol that is bottled in a flat bottle that expands at the very bottom.
After the cognac is purchased, all you have to do is wrap it as carefully as possible with fluffy New Year's rain and decorate all this beauty with small Christmas tree decorations and snowflakes. In addition, we bring to your attention a few more ideas for decorating a New Year's bottle of cognac.
How to decorate a bottle of cognac for a man for a wedding?

 Photo No. 1
 Photo No. 2
  Photo No. 3
 We are accustomed to thinking that a wedding present must be decorated with flowers, ribbons and hearts. In fact, for the wedding celebration of a loved one, you can present a bottle of skate, decorated in a special way. Try to show a little of your imagination and paint it with paints.
Draw whatever you like, the main thing is that in the end your surprise looks bright. Yes, and if you want the newlyweds not to throw away the empty bottle later, then after the paint has dried, be sure to cover the entire surface with colorless varnish.
How to decorate a bottle of cognac for a man’s anniversary?

 Photo No. 1
  Photo No. 2
 Photo No. 3
 An anniversary is an important event for every person. That is why for this holiday it is best to present not just a beautifully decorated bottle of cognac, but an entire composition on a stand. All you have to do is secure the bottle of alcohol on a sturdy stand, and then decorate it with whatever your heart desires.
Chocolate, small marshmallows or marmalade will look great on such a composition. If you want to emphasize the brutality of the gift, then make a bouquet of dried fish and attach it to the stand.
How to decorate a bottle of cognac for a man on Valentine's Day?

 Photo No. 1
 Photo No. 2
  Photo No. 3
 As a rule, men have a rather cold attitude towards such attributes of Valentine's Day as hearts. Therefore, if you paint a bottle of cognac with them or paste them over it, it probably won’t make him very happy.
In view of this, it will be better if you do something more original, for example, a surprise using the terra technique. In this case, to decorate glass containers you will need eggshells, glue, ordinary rope and a couple of artificial stones of different shapes.
So:
- Degrease the bottle with acetone and start applying glue to it
- Apply it in small areas and immediately cover them with pieces of eggshell
- Decorate half the bottle this way
- Next, cut the kraft paper into small pieces and moisten it with water
- When it softens, dip it in PVA glue for 1 minute.
- Remove the paper from the glue and, forming small folds, distribute it over the top of the bottle
- Wait for everything to dry, and then decorate everything with rope and artificial stones
Video: How to decorate a bottle of cognac? Bouquet of sweets
Soon the whole country will congratulate the stronger half of humanity on this courageous holiday. If you give a bottle of alcohol as a gift, you can decorate it with a stylized military uniform - knitted, paper, ribbon or fabric.
Clothes for a bottle - crochet
Today we will crochet this decoration. Master class on bottle decoration from.
Materials and tools
For knitting you will need:
- Yarn "Beaded" olive color, yarn "Children's Hit" white, yellow, blue;
- Hook 1.75mm;
- Scissors;
- Needle.
You can use yarn from the same manufacturer. For example, only beaded. If you use a different thread, then the hook must be selected according to its thickness.
Master Class
We will knit the main part from bottom to top. First, we assemble a chain, the length of which will be equal to the circumference of the bottom of the bottle. This master class uses a 0.5 liter bottle of beer.
So let's start knitting military uniform. We close the chain into a ring and make 2 lifting loops. Next, we knit 1 half double crochet into each loop of the chain. We connect the row with a connecting loop into a 2nd lifting loop.
Photo 1

Then we will simply repeat this row 18 times. And then we will knit the row not with half double crochets, but with double crochets. Calculations are given for a bottle of about 5 liters.
Photo 2

Then we knit a row, but at the end we do not join in lifting loops, but make 3 loops and turn around. We knit in the opposite direction until the end of the row.
Photo 3

Next we will knit 4 more turning rows. We formed the collar. Now we will knit a chain of 18 loops from the yellow thread. This will be one tier of aiguillette.
Photo 4

Then we will make a second tier of 15 loops and attach it above.
Let's tie it up vest.
Using white thread we cast on 21 loops. We turn around and knit 20 single crochets. Then we change the thread to blue and perform 1 more row of single crochets. So, changing the thread in each row, we will complete only 7-8 rows.
Photo 5

We sew this part on the wrong side of the main part so that it sticks out from the cutout.
All that remains is to link beret. We knit 6 stitches into an amigurumi ring. Next we will add according to the amigurumi principle. That is, in one row we knit increases in each column of the bottom row. And in the next one through a column, then through 2 columns. Then every 3 columns and every 4.
We get an amigurumi circle of 36 loops.
Photo 6

The next row will be knitted only behind the back walls of the loop. We perform 36 single crochets.
Next we will knit decreases in each row. Decrease through 4 stitches, knit loops on both walls.
Next we will knit decreases through 3 stitches and through 2 stitches.
Photo 7, 8


We dress up the bottle. The bottle decoration for February 23rd is ready!
Paper bottle decoration
In this master class we will make an officer's uniform for a bottle from colored paper.
To work you will need:
- Colored paper;
- A sheet of white paper;
- Bottle;
- Glue;
- Pencil;
- Scissors;
- Brown satin ribbon.
Cut out a sheet from white paper. It should wrap around the bottle and overlap by about 5-7 mm. The height of the sheet should be approximately 2 - 2.5 cm above the expansion point of the bottle from the neck.

This will be a shirt. It needs to be glued at the front.
Let's make a collar. To do this, bend the corners of the paper at the same level on both sides outward.

We crush the paper on the sides to the bottle, pushing back the excess. We form a triangle at the back.

We bend it down and glue it.
Now we will need satin ribbon as we will be making a tie. Cut out a piece in the shape of a tie from brown ribbon.

Now we wrap the sides inward towards the center and glue them there.

The resulting tie must be glued to the shirt, slightly tucked under the collar.

Now we move on to making a jacket, so we will need green paper.
We cut out the sheet that should wrap the bottle with an overlap of 5 mm. The height of the sheet should be the same as that of a shirt.

Now you need to bend the upper corners of the sheet to the center of the tie and glue them in this position.

The side parts of the sheet need to be bent to the junction of the corners. We push the excess paper inside, forming pockets.


Cut a strip 4 cm wide. Fold it in half horizontally.

The strip should cover the resulting folds on the jacket and form a collar. The length depends on the size of the bottle.

Now let's make a belt. Cut out a wide strip of brown paper. Its length depends on the circumference of the bottle. It should be enough to completely wrap the bottle. Glue the part just below the middle of the bottle. Glue a yellow square in the center.

Now let's make the boots. From black paper you need to cut a strip slightly wider than the belt. They should be the same length. Glue it to the very bottom of the bottle.

Cut out small stars from yellow paper and glue them onto the sides of the collar of the jacket.

We decorate the collar of the jacket. Cut out 2 yellow ticks and glue them.

All that remains is to make the cap. Cut a circle with a diameter of 4 cm from cardboard.

Glue the same circle of green paper on top. Now you need to cut a strip 2 cm wide. It should be long enough to wrap around the cork. Glue the part into a cylinder.

Now with scissors we make cuts of approximately 5 mm at the same distance from each other in a circle. Then we raise the resulting stripes.

Lubricate the strips with glue and glue them to the cap from below.

Trace the top of the cap on green paper and cut out this circle. Then we draw a circle around the bottom of the cap and cut it out. You will get a ring. Lubricate it with glue and put it on through the bottom of the cap. We glue it, thus hiding the cuts. If the cardboard is thick, you can glue thin twine along the edge or simply paint over the edge.
We put the cap on the cork.
This is how the military uniform turned out from colored paper.

Bottle decoration with ribbons

More options for decorating bottles for February 23rd with your own hands
You can sew a military uniform and cap for a bottle and make an order:


The shape can be made from plastic, or:

If your favorite technique is decoupage, then you just need to find suitable napkins to decorate the bottle

However, the theme of bottle design for February 23 is not necessarily military. For example, we have a master class by Oksana Alexandrova ““.

And if you get creative, you can use cardboard to turn a bottle into an airplane:

Men, as you know, are the stronger sex, not without their little weaknesses. And they love receiving gifts no less than us girls. Therefore, on the eve of the main men's holiday on February 23, each of us thinks about the issue of choosing a suitable gift. After all, you want to give not just a present, but something original, exclusive and useful. No man would refuse to receive a bottle of elite alcohol (for example, whiskey or cognac) as a gift. But he will be doubly pleased if you decorate this gift in an original way with your own hands, because a piece of your soul will be put into the handmade product! How to design a bottle will be discussed in this article.
A beautifully designed bottle will be an excellent gift for your beloved man or work colleague.
There are many decoration options. We will look at the following:
- Bottle decor for February 23rd in leather.
- Decorating a gift bottle for February 23 with ribbons.
- Decoupage bottles for men.
- As a bonus: a castle with a “window” using the decoupage technique.
A bottle decorated with leather looks very original and elegant. The design process is not complicated, but it is better to prepare the gift in advance, since the product will take time to dry.

It is not at all necessary to use genuine leather for decoration; an artificial substitute also looks good
After removing all labels from the bottle, degrease it with alcohol. Then we apply glue to the bottle and the skin, glue the skin so that a beautiful relief and folds are formed on it. It is better to choose natural, fairly thin leather. “Moment” is suitable as glue.

The skin quickly absorbs the glue, so we quickly apply the pieces to the glass, simultaneously stretching and fastening the ends
At the same time, you can attach elements of thematic decor to the skin: stars, laces, at your discretion. Decorate the cork using the same principle, adding stars or decorative cord.

A decorative element is attached to the center of the composition
You can leave a free space on the front side of the bottle, apply putty on it and leave everything to dry for several hours, or better yet, overnight. When the putty dries, we make an inscription on it with words of congratulations, scratching the text with some sharp object.

We also use leather to decorate the cork.
The entire bottle is then painted with dark green or brown paint. As soon as painting is completed, wipe the bottle with a cotton swab soaked in solvent so that the paint remains only in the folds of the skin. You can also add a little shine to our bottle by using gold paint, applying it in a light layer into the folds of the skin. All you have to do is wait for the entire composition to dry and you can present it to the recipient!

Even without painting, this bottle looks very beautiful and stylish.
Decorating a gift bottle for February 23 with ribbons
Decorating a bottle with ribbons is very popular today. If you approach the matter creatively and with imagination, you may end up with not just a beautiful thing, but a real designer gift for your man. So let's get started!

Flattened bottles are better suited for this decor option.
To decorate the bottle, use ribbons 2.5 cm wide in white, black, green. Attach double-sided adhesive tape to the sides of the bottle. Start decorating the bottle with white ribbon to imitate a collar. We move from the neck to the bottom. Glue small pieces of tape in the shape of a triangle, pressing the ends to the tape so that they do not intersect. We glue each new piece of tape slightly lower, parallel to the previous one.

The process of decorating a bottle with ribbons does not require special abilities
Having reached the “shoulders”, we begin to wrap the bottle horizontally with a khaki-colored ribbon - this will be our jacket. When half of the bottle is covered, you need to change the color of the bias tape to black to imitate trousers (you can use ribbons 3 cm wide).
We complement our souvenir with decorative details of the “military uniform”: stars, shoulder straps, belt - at your discretion. Place a “tie” of 0.5 cm wide black ribbon on the neck of the bottle. The cork can be decorated with a “cap” cut out of cardboard and covered with fabric or ribbons of the desired color.

Shoulder straps can be easily made from cardboard by covering the blanks with a suitable fabric

For a cap, you can use scraps of thick fabric
Decoupage bottles for men
To decoupage a “man’s” bottle, you should use images of the appropriate theme and color scheme: cars, hunting, sailboats, travel, weapons... Choose a design theme based on the interests and hobbies of your man. The materials are also varied: napkins, rice paper, fabric, clay. Shells, laces, stars and much more are used as additional accessories.

Materials for decoupage bottles
Before starting work, you need to remove all stickers and labels from the bottle, and also degrease the surface of the vessel using glass detergent.

Thoroughly degrease the glass surface
Then we paint the bottle tightly with acrylic primer. This can be done in several layers.

It is more convenient to prime with a piece of sponge clamped in a clothespin

When the soil is dry, try on the image on the bottle

We trace the contours with a pencil on the back of the paper
We lower the paper, napkin or fabric with the image we need into water for one to two minutes.

Soak the paper in water
In the meantime, treat the bottle with glue varnish.

Using a brush, apply decoupage varnish to the area of the bottle under the image.
We take the image out of the water and wait for the excess liquid to drain. After this, apply it to the surface of the bottle. We do this carefully so that folds do not form.

Carefully smooth out the wrinkles
We again treat the surface of the bottle with varnish. If there are separate torn out pieces of the image, carefully join them with the main fragment and also treat it with varnish.

Carefully glue the missing fragments of the picture
You can complement the decor with bronze or golden pigment, as well as tags that match the theme.

The part of the bottle where there is no picture is covered with beautiful paint.

After the paint has dried, cover the entire bottle with a thin layer of bitumen varnish.

We prepare suitable tags

Attach the tags to the neck using laces

In this master class you will be able to learn step by step the process of creating your product. As you work, you will see how to decorate a bottle with satin ribbons. In this master class with step-by-step photos, both adults and children can handle bottle decor.
MATERIALS AND TOOLS
For work we will need:
- gift bottle (in this case cognac),
- blue satin ribbon (or green, khaki), 1 cm wide,
- black satin ribbon, 1 cm wide,
- white satin ribbon, 5 cm wide,
- cardboard,
- scissors,
- universal glue,
- decorative stars,
- tweezers,
- scotch,
- iron.

MASTER CLASS
Let's start making clothes for the bottle. Cut 12 cm of satin ribbon from the roll.
 Iron the corners of the satin ribbon.
 We fold the tape by 1/3 and iron it again, so it looks like “ shirt collar».
 Cut a white satin ribbon to the size of the neck and glue it to it.
 Glue the collar on top of the tape.
 We tie it from a black satin ribbon tie.
 We put a tie on the neck of the bottle.
 To ensure that the tie does not interfere with the further decoration of the bottle, you need to lift it and secure it with tape.
 We continue to make clothes for the bottle.
Now we will decorate the bottle with a blue satin ribbon - the future jacket. Cut the tape a little larger than the neck of the bottle and glue the blue tape under the collar.
 Then we cut off the blue tape again and glue it, slightly overlapping the previous tape.

Thus, row by row we glue the blue satin ribbon. You need to decorate about half of the bottle with blue ribbon.
 Now take a black satin ribbon and glue it to the bottle exactly horizontally.
 In this case, we will not cut the tape, but simply glue it in a circle.
 We coat the bottle with glue and tightly glue the tape to the very bottom of the bottle.
 Let's put the bottle aside and get busy shoulder straps. For this we need a blue satin ribbon, two pieces of 3 cm each.
 On one side we cut off two corners.
 Glue the stars to the tape; regular tweezers are best for this.
 We glue the shoulder straps to the bottle.
 Now let's get started cap. Cut a strip of cardboard 2 cm wide and a circle slightly larger than the diameter of the bottle cap.
 We cover a strip of cardboard with satin ribbon.
 We measure the diameter of the neck and glue the cardboard into a circle.
 We also cover the circle with satin ribbon.
 Glue the two elements together.
 Now we glue the star to the cap.
 This is the bottle we got in military uniform.
You can give your product as a holiday gift to relatives, dad, or grandfather. Every person will be glad to receive a gift made with their own hands, because you put your soul and mood into the creation process. I wish you success and creative ideas.
It’s nice to receive a bottle of good alcohol as a gift on February 23rd. And something carefully and creatively decorated with your own hands is doubly pleasant, because you didn’t just buy such a gift in a store - a huge amount of work and creativity was put into it! In this article you will find various ideas on how to decorate a bottle as a gift for February 23rd with your own hands.
There are many decoration options.
- The simplest one is using decoupage technique. You can handle this, even if you have little experience, the main thing is to follow the instructions exactly. Well, it’s better to first practice on some unnecessary bottle :)
- Decorate with ribbons or leather.
- If you are good at crocheting and knitting, knit.
- If you sew well, make an original “suit”, for example, a shirt with a tie or a military uniform.


Idea for decorating a bottle for February 23rd: leather decor

You will need:
- The bottle itself (where would we be without it).
- Genuine Leather. It is best to take thin enough leather that will fit well along the contour we need - for example, an old jacket is suitable for this purpose.
- Decorative cords.
- Glue "Moment".
- Thematic elements for decoration, for example, badges with stars, the coat of arms of Russia, etc. - whatever you can think of and find. Stars and crests can be found in military stores.
- Oil-adhesive putty.
- Cling film.
- A knife or something sharp.
- Alcohol.
- Brown and gold paint.
- Brush.


We remove all labels from the bottle and degrease it with alcohol. We apply Moment glue to the bottle and the skin, wait a couple of minutes and begin gluing the skin so that it lies in beautiful folds.

For now we only need to paste over the “shoulders” and the neck of the bottle, so we don’t coat the rest of it with glue yet. At the same time, we attach the stars to the skin.
With the coat of arms it’s a little different - first we attach it to a piece of leather, then we bend the antennae, grease the back side with glue and only then attach it to the bottle. Piece by piece, we continue to lubricate the bottle with “Moment” and glue pieces of leather to it, not forgetting to make folds and add stars. We attach the main, golden star to one of the “shoulders”.


You need to leave some free space on the front of the bottle. Using Moment-Crystal glue, we glue a golden decorative cord along its contour. In order to liven up the bottle, you can draw a cord around several stars and the neck.


We apply oil-glue putty to the remaining free space, cover it with cling film so that folds are formed, and leave our composition to dry overnight. If you don’t have time, and the holiday is tomorrow, then you can dry this place with a hairdryer.

While the putty is drying, you can take the cork and use the same principle to decorate it with leather, decorating it with gold cord and stars.

Is the putty dry? We remove the film, write on it with a pencil the name of our work or words of congratulations, and carefully scratch the text with a knife.

We paint the entire bottle with brown paint and then wipe it with a cloth with solvent, so that the paint remains only in the folds of the skin.

Using a semi-dry brush, paint the composition with golden paint - so that only the folds of the skin have a golden coating.

When this whole structure has dried well enough, you can give our bottle to its recipient by February 23rd!

Another idea for decorating a gift bottle for February 23rd is decorating with ribbons
You can simply decorate the bottle with ribbons (biased tape), or you can get creative and “depict” a whole suit for our bottle, for example, a sailor or a military man - just choose the ribbons of the desired color.


And making such a gift is very simple. To make it you need:
- Bottle (of course).
- Bias tape in the right colors - dark green and brown for a military suit, white, blue and black for a sailor bottle.
- Double sided tape.
- Scissors.
- Small belt buckle.
- For the cap - fabric and pieces of cardboard.
We attach double-sided tape to the front and back of the bottle. It is best to tear off the film that protects the adhesive tape gradually as you add new turns of tape - this is done so that the tape does not stick where it should not be and does not interfere with your work.

We start decorating the bottle with ribbons from the neck. We press a small piece of tape against the back of the tape, wrap it around the neck and trim the ends so that they intersect each other in the shape of a triangle. We do each next turn in the same way, only lower than the previous one.

When the “shoulders” are completely covered with tape, we begin to make the “suit” itself. Now we place the skeins horizontally, around the bottle, not forgetting to peel off the double-sided tape little by little. Having reached the middle, we change the ribbon to black or brown - these are trousers. Carefully wrap the bottle with tape all the way to the bottom.